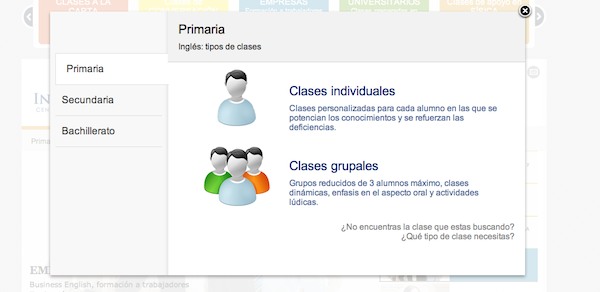
In one of the last websites i had to program and design as a freelance, the client wanted a way to show the information without changing the page structure in order to make it simple for the visitor to go back to the main page.
I came across with a simple floating window solution. I show a Photoshop sketch to the client and next day i started working on it.
I started creating the floating window with HTML and CSS:
<div id="darkOverlay">
    <div id="floatWrap">
        <div id="floatContent">
            <a class="close"></a>
            <div id="mainFloat"></div>
        </div>
    </div>
</div>
Code language: HTML, XML (xml)
/*
It defines the layer which will cover the site once the
floating window is showed.
*/
#darkOverlay{
    background: none repeat scroll 0 0 rgba(255, 255, 255, 0.8);
    cursor: auto;
    display: block;
    height: 100%;
    left: 0;
    overflow-y: auto;
    position: fixed;
    top: 0;
    width: 100%;
    z-index: 100; /*over everything */
}

/*
We want the content to be center...
*/
#floatWrap{
    margin: 0 auto;
    position: static;
    width: 878px;
    z-index: 102;
}

/*
Defining the window wrap...
*/
#floatContent{
    float: left;
    background: white;
    box-shadow: 0 3px 8px rgba(34, 25, 25, 0.4);
    z-index: 101; /*over the overlay*/
    margin:80px 0 80px 0;
    position:relative;
}
/*
Defining the window...
*/
#mainFloat{
    float: left;
    margin: 0;
    width: 900px;
    min-height: 500px;
    position: relative;
    /*witht his background we divide visually
    the space*/
    background: url('imgs/bgFloat.gif') repeat-y #fff;
}

/*
Adding the X for closing the window
*/
.close{
    position: absolute;
    top: -15px;
    right: -15px;
    width: 30px;
    height: 30px;
    background: transparent url('imgs/fancybox.png') -40px 0px;
    cursor: pointer;
    z-index: 1103;
    display: inline;
}
Code language: CSS (css)
Like this we should have a white floating window with a white semitransparent layout over the page.
Then, we hide it using display:none on #darkOverlay and we create an event to show it when someone clicks over the selector floatMenu.
$(document).ready(function(){
    /*
    * Clicking over the .floatMenu selector, we will show the floating window.
    */
    $('.floatMenu').click(function(event){
        // Showing the floating window
        $('#darkOverlay').show();

        // Hidding the background page scroll
        $("body").css("overflow", "hidden");
    });
});
Code language: JavaScript (javascript)
Then create the HTML with the selector which will allow us to show the floating window:
<div class="floatMenu">
    <a href="#">Click here to show the floating menu</a>
</div>
Code language: HTML, XML (xml)
Fine, now we can show it. But… we can not hide it 🙂
Lets fix it with this:
$(document).ready(function(){
    /*
    We use this to hide the floating window in case they click outside it.
    As html will be 'everything', we will use then an stopPropagation event.
    */
    $('html, .close').click(function(){
        $('.selection').hide();
        $('#darkOverlay').hide();
        $("body").css("overflow", "visible");

    });

    /*
    Here we use the stopPropagation event in order to prevent hidding the
    floating window when we click anywhere inside the #mainFloat element.
    */
    $("#mainFloat").click(function(event){
        event.stopPropagation();
    });

    /*
    Adding the option to hide the windows by pressing the 'escape' (ESC)
    key with the keyboard.
    */
    $(document).keyup(function(e) {
        if (e.keyCode == 27) {
            $('#darkOverlay').hide();
            $("body").css("overflow", "auto");
        }
    });

    /*
    Clicking over the .floatMenu selector, we will show the floating window.
    */
    $('.floatMenu').click(function(event){
        // Showing the floating window
        $('#darkOverlay').show();

        // Hidding the background page scroll
        $("body").css("overflow", "hidden");

        /* In order to prevent hidding the floating window, as we are on the 'html' element.
        We have to stop the click event propagation so it won't reach 'html' */
        event.stopPropagation();
    });
});
Code language: JavaScript (javascript)
Everything is explained on the comments.
Now we can hide and show it. Lets add some content and structure to the floating window. This is the final HTML content:
<div id="darkOverlay">
    <div id="floatWrap">
        <div id="floatContent">
            <a class="close"></a>
            <div id="mainFloat">
                <div id="menuLeft">
                    <ul>
                        <li class="active"><a class="floatCategory" href="#" data-content="Hello world">Option 1</a></li>
                        <li class=""><a class="floatCategory" href="#" data-content="Bye bye">Option 2</a></li>
                        <li class=""><a class="floatCategory" href="#" data-content="Car">Option 3</a></li>
                        <li><a class="floatCategory" href="#" data-content="Steve Jobs">Option 4</a></li>
                    </ul>
                </div>
                <div id="infoContent">
                </div>
            </div>
        </div>
    </div>
</div>
Code language: HTML, XML (xml)
As we can see, we added some tabs and a DIV for the window content.
The active tab will use `class=”active”.
For this HTML, we add the following CSS:
/* Left tabs menu*/
#menuLeft{
    float:left;
    width:223px;
    margin:90px 0 0 0;
}
#menuLeft ul{
    margin: -10px 0 0 0;
    float: left;
    list-style: none outside none;
    padding: 0;
    width: 100%;
}
#menuLeft li{
    border-bottom: 1px solid #DDD;
    float: left;
    padding: 0 0 0 12px;
    width: 190px;
    margin: 0 10px 0 10px;
}
#menuLeft ul li a{
    color: #333;
    display: block;
    padding: 18px 0;
    text-decoration: none;
    width: 204px;
    font-size:1.2em;
}
#menuLeft a:hover{
    text-decoration:none;
}
#menuLeft .active,
#menuLeft .active:hover {
    background: #fff;
    width: 194px;
    border: 1px solid #ddd;
    border-width: 1px 0 1px 1px;
    margin-top: -1px;
    margin-right: -2px;
    margin-left:10px;
    padding:0 0 0 20px;
}
#menuLeft li:hover, #horario li:hover {
    background: #eee;
}
#infoContent{
    float: left;
    width: 677px;
    padding: 0;
    position:relative;
}
Code language: CSS (css)
Now, in order to make the tabs work, we will add this jQuery code:
// When clicking on the left tab menu...
$('.floatCategory').click(function() {

    // Chaning the active tab...
    $(this).parent().addClass("active").siblings().removeClass('active');

    //We have to know in which tab the user has clicked
    //so we take the attribute 'data-content' as an identifier of the tab
    var content = $(this).attr('data-content');

    /* Here you could do whatever you want, getting
    info from JSON, using the .load function... having fun!!*/
    $("#infoContent").html(content);
});
Code language: JavaScript (javascript)
We need to add it inside the $('.floatMenu').click event as we stopPropagation over `#main selector…
Here you have the final code:
<script type="text/javascript" src="https://ajax.googleapis.com/ajax/libs/jquery/1.7.2/jquery.min.js"></script>
<script type="text/javascript" src="https://ajax.googleapis.com/ajax/libs/jqueryui/1.8.18/jquery-ui.min.js"></script>

<script type="text/javascript">
    $(document).ready(function(){

        /*
        We use this to hide the floating window in case they click outside it.
        As html will be 'everything', we will use then an stopPropagation event.
        */
        $('html, .close').click(function(){
            $('.selection').hide();
            $('#darkOverlay').hide();
            $("body").css("overflow", "visible");

        });

        /*
        Here we use the stopPropagation event in order to prevent hidding the
        floating window when we click anywhere inside the #mainFloat element.
        */
        $("#mainFloat").click(function(event){
            event.stopPropagation();
        });

        /*
        Adding the option to hide the windows by pressing the 'escape' (ESC)
        key with the keyboard.
        */
        $(document).keyup(function(e) {
            if (e.keyCode == 27) {
                $('#darkOverlay').hide();
                $("body").css("overflow", "auto");
            }
        });

        /*
        Clicking over the .floatMenu selector, we will show the floating window.
        */
        $('.floatMenu').click(function(event){
            // Showing the floating window
            $('#darkOverlay').show();

            // Hidding the background page scroll
            $("body").css("overflow", "hidden");

            /*default content for the first tab. (you could use
            JSON, .load, append... whatever you want */
            $("#infoContent").html('Hello world');

            // When clicking on the left tab menu...
            $('.floatCategory').click(function() {

                // Chaning the active tab...
                $(this).parent().addClass("active").siblings().removeClass('active');

                //We have to know in which tab the user has clicked
                //so we take the attribute 'data-content' as an identifier of the tab
                var content = $(this).attr('data-content');

                /* Here you could do whatever you want, getting
                info from JSON, using the .load function... having fun!!*/
                $("#infoContent").html(content);
            });

            /* In order to prevent hidding the floating window, as we are on the 'html' element.
            We have to stop the click event propagation so it won't reach 'html' */
            event.stopPropagation();
        });

    });
</script>
Code language: HTML, XML (xml)
CSS
/*
This defines the workspace where i place the demo.
*/
#container {
    text-align: left;
    background: #FFF;
    width: 865px;
    margin: 20px auto;
    padding: 20px;
    border-left: 1px solid #CCC;
    border-right: 1px solid #CCC;
    -moz-box-shadow: 0px 0px 10px #BBB;
    -webkit-box-shadow: 0px 0px 10px #BBB;
    box-shadow: 0px 0px 10px #BBB;
}


/*
It defines the layer which will cover the site once the
floating window is showed.
*/
#darkOverlay{
    background: none repeat scroll 0 0 rgba(255, 255, 255, 0.8);
    cursor: auto;
    display: none; /*hidding if there's no call */
    height: 100%;
    left: 0;
    overflow-y: auto;
    position: fixed;
    top: 0;
    width: 100%;
    z-index: 100; /*over everything */
}


/*
We want the content to be center...
*/
#floatWrap{
    margin: 0 auto;
    position: static;
    width: 878px;
    z-index: 102;
}


/*
Defining the window wrap...
*/
#floatContent{
    float: left;
    background: white;
    box-shadow: 0 3px 8px rgba(34, 25, 25, 0.4);
    z-index: 101; /*over the overlay*/
    margin:80px 0 80px 0;
    position:relative;
}
/*
Defining the window...
*/
#mainFloat{
    float: left;
    margin: 0;
    width: 900px;
    min-height: 500px;
    position: relative;
    /*witht his background we divide visually
    the space*/
    background: url('imgs/bgFloat.gif') repeat-y #fff;
}


/*
Adding the X for closing the window
*/
.close{
    position: absolute;
    top: -15px;
    right: -15px;
    width: 30px;
    height: 30px;
    background: transparent url('imgs/fancybox.png') -40px 0px;
    cursor: pointer;
    z-index: 1103;
    display: inline;
}


/* Left tabs menu*/
#menuLeft{
    float:left;
    width:223px;
    margin:90px 0 0 0;
}
#menuLeft ul{
    margin: -10px 0 0 0;
    float: left;
    list-style: none outside none;
    padding: 0;
    width: 100%;
}
#menuLeft li{
    border-bottom: 1px solid #DDD;
    float: left;
    padding: 0 0 0 12px;
    width: 190px;
    margin: 0 10px 0 10px;
}
#menuLeft ul li a{
    color: #333;
    display: block;
    padding: 18px 0;
    text-decoration: none;
    width: 204px;
    font-size:1.2em;
}
#menuLeft a:hover{
    text-decoration:none;
}
#menuLeft .active,
#menuLeft .active:hover {
    background: #fff;
    width: 194px;
    border: 1px solid #ddd;
    border-width: 1px 0 1px 1px;
    margin-top: -1px;
    margin-right: -2px;
    margin-left:10px;
    padding:0 0 0 20px;
}
#menuLeft li:hover, #horario li:hover {
    background: #eee;
}
#infoContent{
    float: left;
    width: 677px;
    padding: 0;
    position:relative;
}
Code language: CSS (css)<div id="container">
<div id="darkOverlay">
<div id="floatWrap">
<div id="floatContent">
<a class="close"></a>
<div id="mainFloat">
<div id="menuLeft">
<ul>
<li class="active"><a class="floatCategory" href="#" data-content="Hello world">Option 1</a></li>
<li class=""><a class="floatCategory" href="#" data-content="Bye bye">Option 2</a></li>
<li class=""><a class="floatCategory" href="#" data-content="Car">Option 3</a></li>
<li><a class="floatCategory" href="#" data-content="Steve Jobs">Option 4</a></li>
</ul>
</div>
<div id="infoContent">
</div>
</div>
</div>
</div>
</div>
<div class="floatMenu"><a href="#">Click here to show the floating menu</a></div>
</div>
Code language: HTML, XML (xml)You can have a look at the code working or even download it on the live demo:


")
