To use a video background, we have to use the HTML 5 <video> element with position absolute inside a container wrapper.
Videos are increasingly common on websites nowadays and are a great way to create a modern website. With just a bit of CSS, you can add a video background to your site in a matter of minutes. However, note that this technique works only for <video> elements. This means the video will have to be hosted somewhere. You can also use CSS to create a YouTube video background, but that’s not what this tutorial is about.
Finding a background video
If you don’t have a video yet, the easiest way to find videos for your site is by using video stock galleries like Pixabay or Pexel.

Once you find the one you want to use, you’ll have to download it and upload it to your server (or CDN services like Cloudinary).
Once uploaded, we have the URL of the video and we can use it in our <video> element.
Adding the HTML for the video
For the video, we’ll be using the HTML5 video element. It expects at least a video source file and can be configured by passing multiple HTML attributes.
For our example ,we’ll be using this:
<video playsinline autoplay muted loop poster="cake.jpg">
    <source src="my-video-url.webm" type="video/webm">
    Your browser does not support the video tag.
</video>
Code language: HTML, XML (xml)
We’ll talk later more about the background video configuration and the video formats.
Placing the video in the background with CSS
Usually, in CSS, we set the background image by using the background property or the background-image one.
background: url(imgs/my-background-image.png);
background-size: cover;
Code language: CSS (css)
However, the background property only works for images and colors. Not with videos.
Now we have a standard video element, so how do we convert it into a background? We’ll be using a little trick here. Using the CSS, position: absolute we will simulate a background element.
video {
  position: absolute;
  top: 0;
  left: 0;
}
Code language: CSS (css)
This will place our video outside the normal flow of the document and relative to the element we choose within its parents.
So, time to add our video container! We’ll be using a div element as the container for our video. We called it video-wrapper.
<div class="video-wrapper">
  <video playsinline autoplay muted loop poster="cake.jpg">
    <source src="my-css-video-background.webm" type="video/webm">
    Your browser does not support the video tag.
  </video>
</div>
Code language: HTML, XML (xml)
And here’s where the magic happens:
.video-wrapper {
  /* Telling our absolute positioned video to
  be relative to this element */
  position: relative;

  width: 400px;
  height: 200px;

  /* Will not allow the video to overflow the
  container */
  overflow: hidden;

  /* Centering the container's content vertically
  and horizontally */
  text-align: center;
  display: flex;
  align-items: center;
  justify-content: center;
}
Code language: CSS (css)
I added comments on the CSS code so you can see what each of the properties is for.
Making the background video cover the whole container
It’s common for backgrounds to cover the whole container. We usually do this with CSS by using the style background-size: cover directly on the background image. But because in this case, our video is not actually a CSS background, we’ll be using another little trick by using object-fit: cover it together with height: 100% and width: 100% on our video element.
video {
  /** Simulationg background-size: cover */
  object-fit: cover;
  height: 100%;
  width: 100%;

  position: absolute;
  top: 0;
  left: 0;
}
Code language: CSS (css)
To illustrate this better, here’s an example of a video background not covering the whole container:
And here’s the same video background covering the whole container:
Adding elements on top of the video background
Right now there’s nothing special we have to do in order to add content on top of our video. And that’s because we added the property position: relative to the video container when setting the video as a background (which is absolute positioned).
Anything that you add after the video element will be positioned on top of it.
<div class="video-wrapper">
  <video playsinline autoplay muted loop poster="cake.jpg">
    <source src="my-css-video-background.webm" type="video/webm">
    Your browser does not support the video tag.
  </video>

  <!-- This will be positioned on top of our video background -->
  <div class="header">
    <h1>Blueberry Cheesecake</h1>
    <button>Recipe here</button>
  </div>
</div>
Code language: HTML, XML (xml)
Here’s the final result:
Configuring the video
If you noticed, in our HTML code we’ve added quite a few things on the video element. The most important ones are loop, muted and autoplay.
<video playsinline autoplay muted loop poster="cake.jpg">
    <source src="my-css-video-background.webm" type="video/webm">
    Your browser does not support the video tag.
</video>
Code language: HTML, XML (xml)
Videos won’t be able to autoplay unless we mute them first. And if you are using a video background, using the loop option is quite common too, so the video will play endlessly.
The poster is the image we want to show while the video is still loading and can’t yet autoplay.
Video formats and browser compatibility
The HTML 5 video element allows the use of multiple source files. This means we can provide our video in different formats for browser compatibility.
<video playsinline autoplay muted loop poster="my-static-image.jpg">
    <source src="my-video-url.webm" type="video/webm">
    <source src="my-video-url.mp4" type="video/mp4">
    Your browser does not support the video tag.
</video>
Code language: HTML, XML (xml)
In this example, we first try to load the webm video, and if the browser can’t play it, it will fall back to the mp4 version of it.
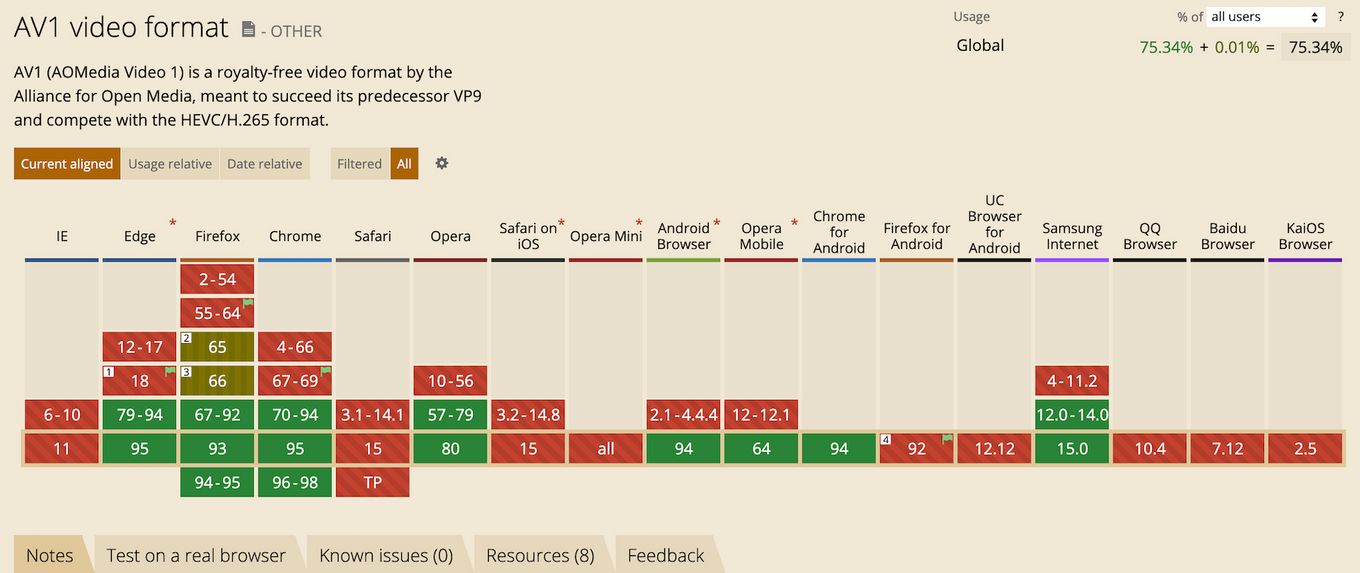
Not all browsers can play all kinds of video formats, see the compatibility table for each video format.

The mp4 format is widely accepted by most modern browsers, but using alternatives like webm can come in handy to save bandwidth too. So, adding both can be a good combination.
If you wonder how to convert from one format to another, you can use any of the online converters. Just Google “mp4 to webm” or “webm to mp4” and you’ll find plenty of converters online.
Conclusion
There’s no excuse to not use videos nowadays. Videos on websites are a very powerful design tool that can provide your website with a modern look. They are easy to implement, ligther that GIF animations, and of high quality.
As you could see, you only need a few lines of CSS to set any video as a background. And, if you want to go one step further, you can go full-screen by using components like fullPage.js. Check out the video example here.
![How To Use Carrd to Create a Website [The Ultimate Guide] how to use carrd share](https://alvarotrigo.com/blog/wp-content/uploads/2023/08/how-to-use-carrd-share-300x150.png)
![30+ Best Church Website Templates [WordPress & HTML] church website templates share](https://alvarotrigo.com/blog/wp-content/uploads/2023/08/church-website-templates-share-300x150.png)

![7+ Amazing Video Portfolio Websites [Examples] video portfolio website share](https://alvarotrigo.com/blog/wp-content/uploads/2023/08/video-portfolio-website-share-300x150.png)
![JavaScript Image Slider [ How To Build One ] javascript slider how to build one big](https://alvarotrigo.com/blog/wp-content/uploads/2023/08/javascript-slider-how-to-build-one-big-300x150.png)
