Sending and receiving messages has become an integral part of our lives. You can now quickly get in touch with someone via text, even without incurring charges on your iPhone, thanks to iMessage.
However, sometimes you might receive a “message blocking is active” notification when trying to send a text. This can be very frustrating and inconvenient. The error mostly appears when you haven’t turned off message blocking on your iPhone.
Keep reading to learn how to turn off “message blocking is active” on an iPhone. We’ll also cover the cause of the error message and whether you can see blocked texts on your device.
Why Does iPhone Show “Message Blocking Is Active?”
iPhone shows the “message blocking is active” error text because you’ve blocked the recipient or the other person has blocked you. It can also appear when your carrier settings or iOS is outdated or has network issues. This message may also show for those not using an eSim if the sim card is inserted incorrectly.
In some instances, you might experience a “ghost touch.” Like pocket dial, this happens when something comes in direct contact with your screen, causing it to go to various options. It is common, especially when your phone is in your pocket.
Ghost touching might tamper with your date and time settings on iMessage, causing the “message blocking is active” error.
How to Deactivate Message Blocking on iPhone
You must turn off message blocking on your iPhone if it causes problems with how you send or receive messages.
Here are the steps to deactivate message blocking on iPhone:
1. Turn iMessage Off
Deactivating and reactivating iMessage can help turn off message blocking when it is active on an iPhone by kick-starting your service back into action. All you have to do is switch it off and back on to see if the error has cleared.
Below are steps on how to turn off iMessage:
-
Step 1. Go to “Settings.”
-
Step 2. Tap on “Messages.”
-
Step 3. Toggle the switch next to “iMessage.”
This will automatically disable your iMessage. After turning off your iMessages, texts will only be sent as SMS. Follow the same steps to reactivate iMessage.
Learn more about Turning iMessage On and Off.
2. Unblock the Contact You Are Messaging
You can unblock a contact to turn off message blocking on iPhone 13 and other models in two ways: through the text messaging app or from settings.
Method 1: Unblocking a Contact Via the Messaging App
Note: This only works if you didn’t delete the message thread of the contact you want to unblock.
Here are the steps to unblock a contact directly from the text messaging app:
-
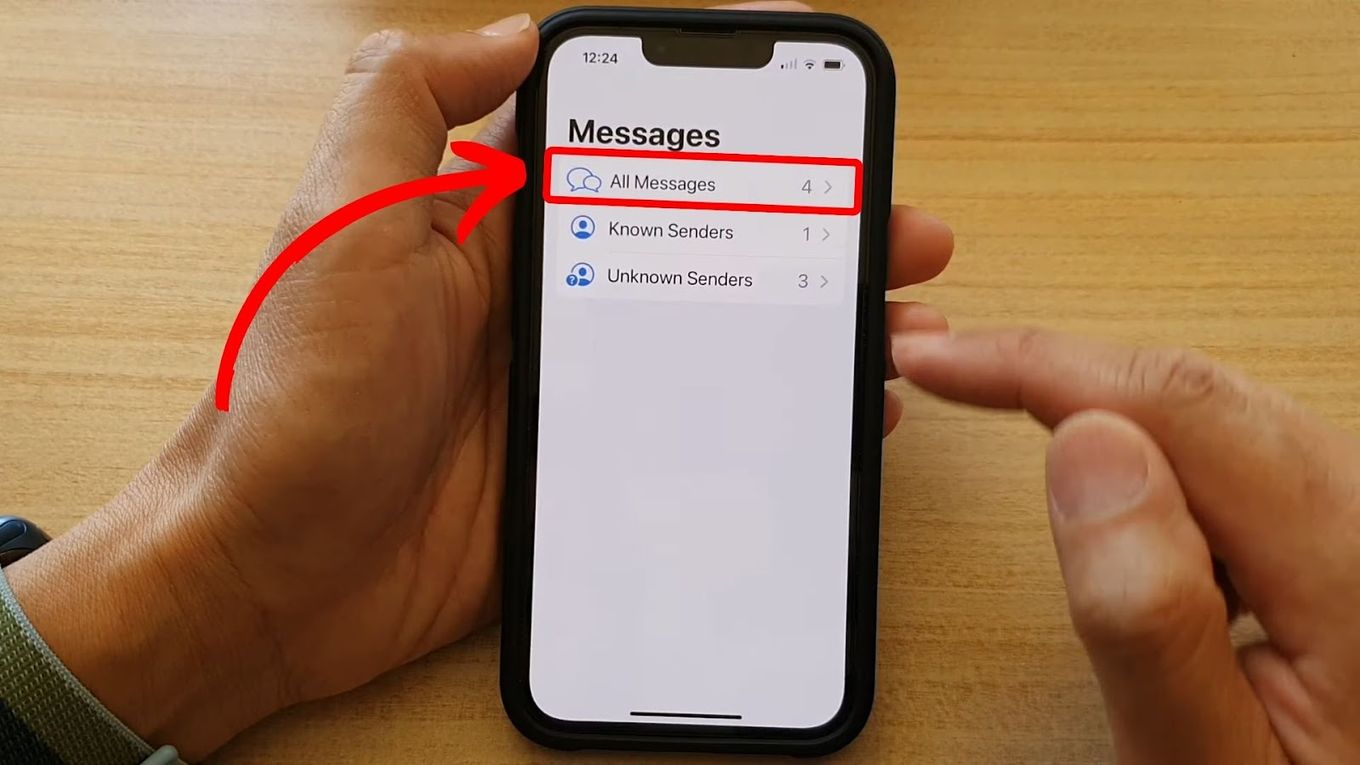
Step 1. Open “Messages.”
-
Step 2. Tap on “All Messages.”

Note: This option only appears on iPhone 13 and later models. If you have an earlier model than that, skip this step.
-
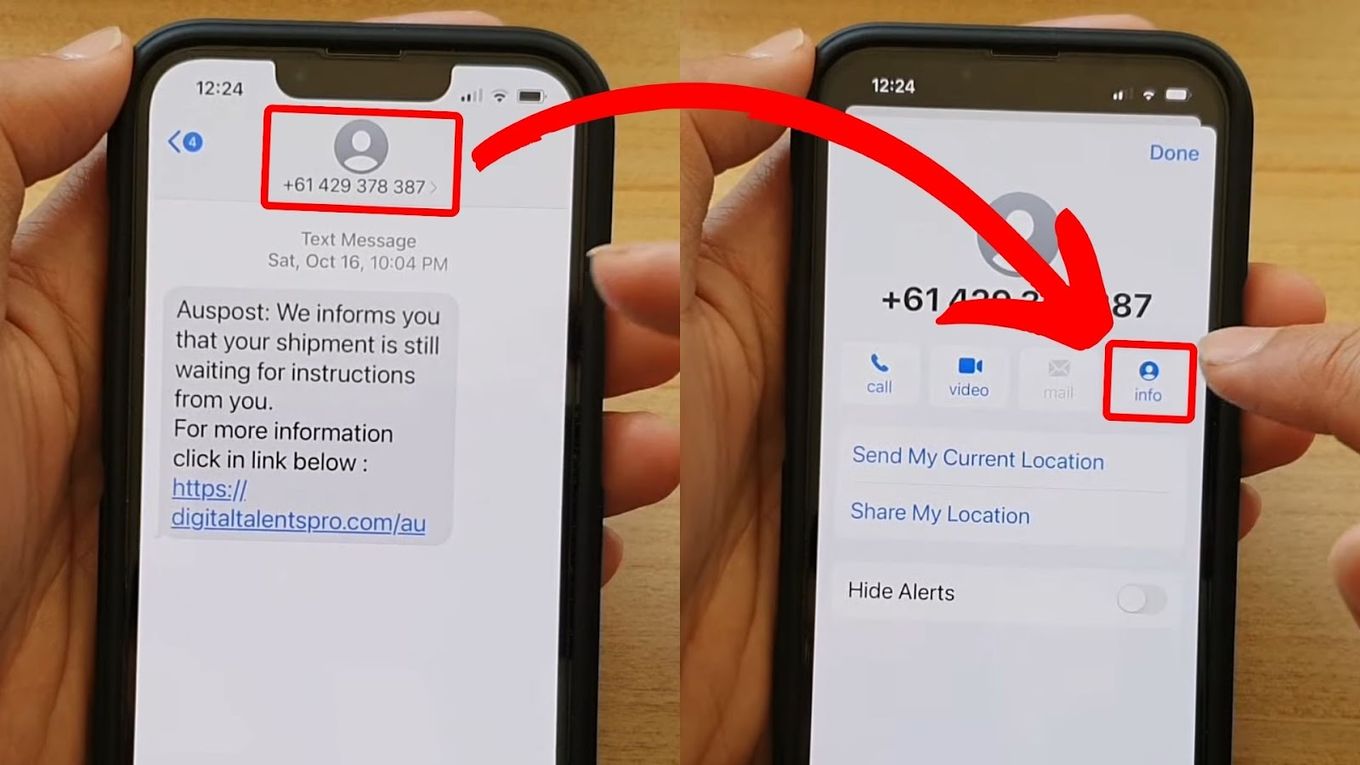
Step 3. Find and select the contact you blocked.
-
Step 4. Tap on the number.
You can tap on the number or profile at the top of your screen.
-
Step 5. Choose “Info.”
-
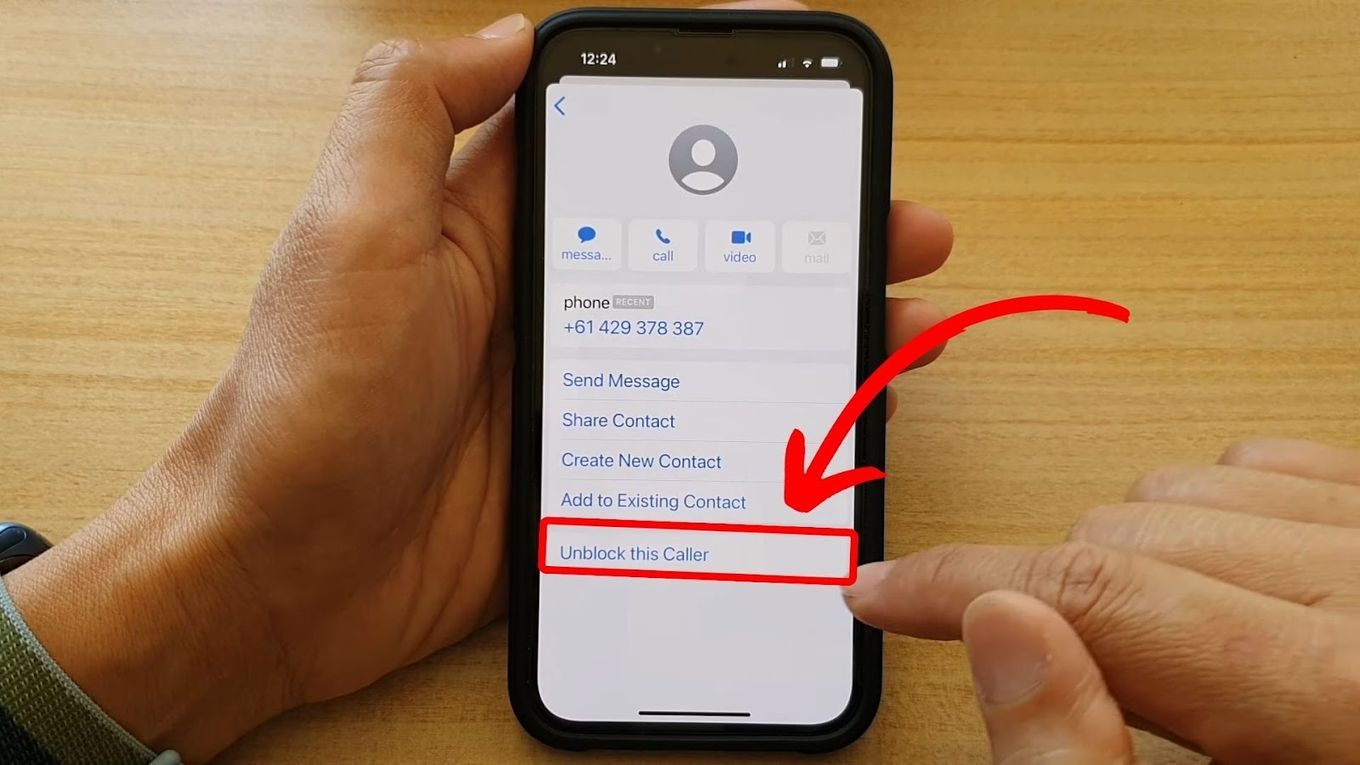
Step 6. Touch “Unblock this caller.”
Tap on done to unblock the contact successfully.
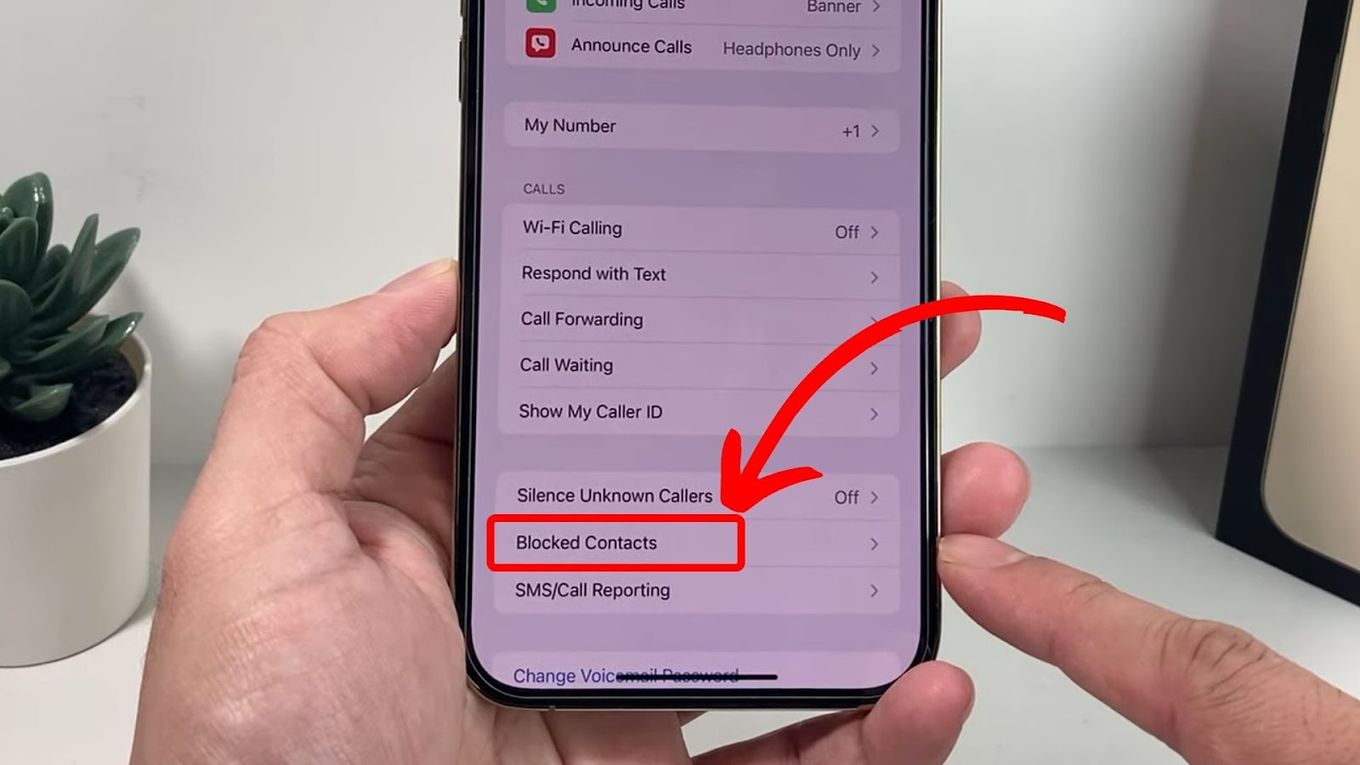
Method 2: Unblocking a Contact Through the “Settings” App
Below are steps on how to unblock contact from the settings app:
-
Step 1. Open “Settings.”
-
Step 2. Go to “Phone.”
-
Step 3. Scroll to “Blocked Contacts.”
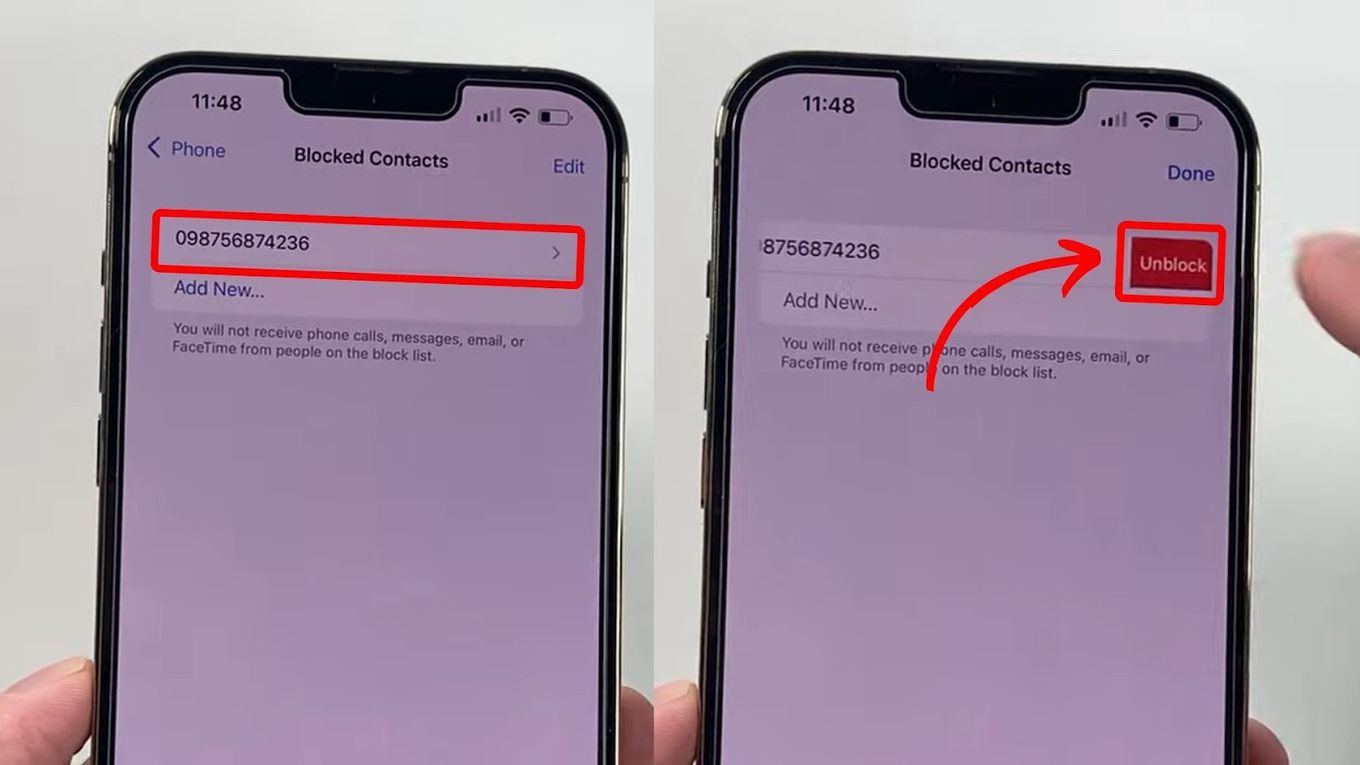
-
Step 4. Tap on “Edit.”
-
Step 5. Tap on “Remove” and then “Unblock.”
The remove option is the “-” icon that will appear on the right side of the blocked contacts after you tap on “Edit.” After unblocking, tap “Done” at the top right of your screen to save the changes.
3. Reset Date and Time Settings
Below are the steps to manually reset the date and time settings on your iPhone:
-
Step 1. Open “Settings.”
-
Step 2. Scroll to “General.”
-
Step 3. Select “Date & Time.”
-
Step 4. Deactivate “Set automatically.”
-
Step 5. Go to “Time Zone.”
Choose your city and country manually as per your location and go back.
-
Step 6. Adjust your date and time.
You can enable 24 hours by toggling on the button at the top of your screen beside 24-Hour Time. However, this option isn’t available for all countries.
Learn more about Resetting Date and Time on an iPhone.
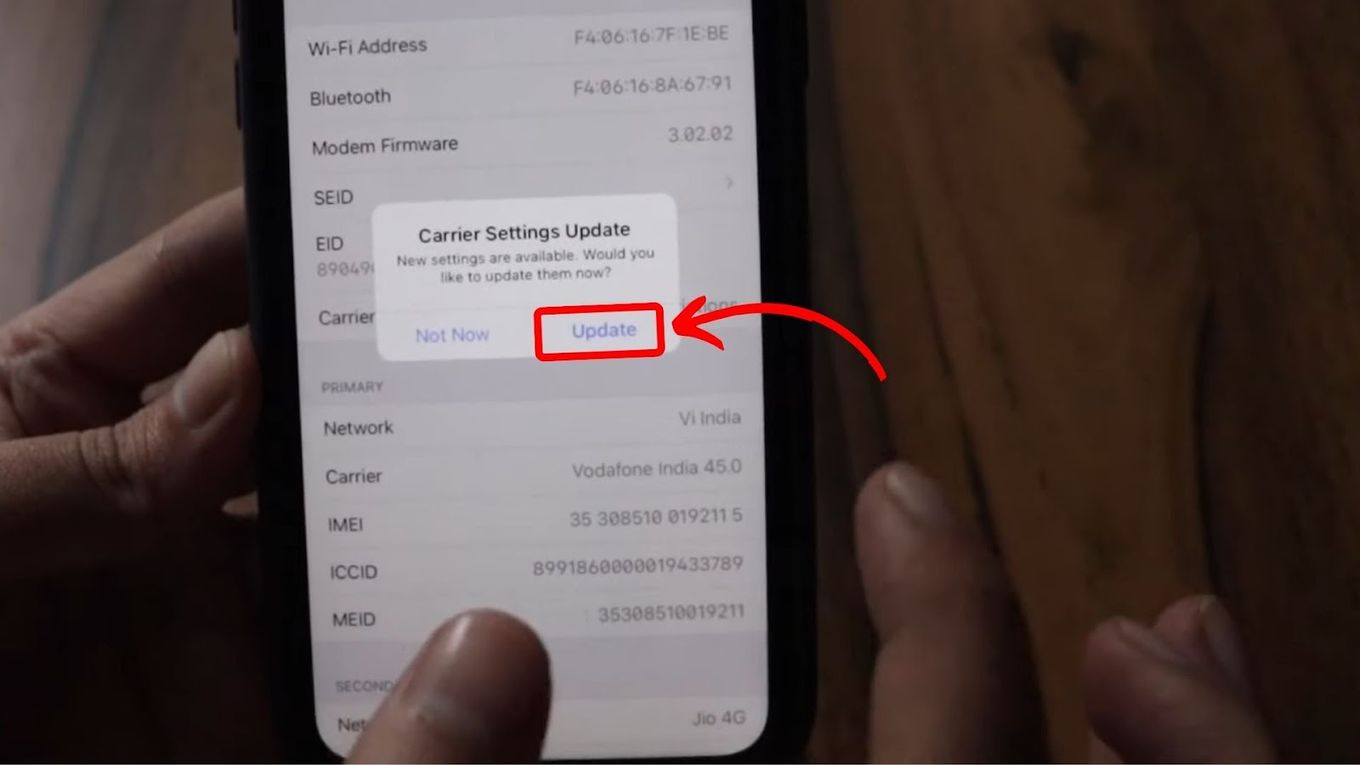
4. Update iPhone Carrier Setting
Usually, you’ll receive a notification when new settings are available. However, manually updating carrier settings helps to improve the cellular network and might even turn off message blocking on iPhones.
Here are the steps to update carrier settings on your iPhone:
- Step 1. Make sure your iPhone has a Wi-Fi or cellular connection.
- Step 2. Go to “Settings.”
- Step 3. Select “General.”
- Step 4. Choose “About.”
- Step 5. Scroll to “Carrier.”
If there are any new carrier settings available, a pop-up will appear. Tap update to initiate the process, which only takes a few minutes. However, you’ll see the current settings if no new updates are available.
Learn more about Manually Updating an iPhone’s Carrier Settings.
5. Update Your iOS
Before updating your iOS, back up your iPhone to avoid losing important information. You can carry out an iPhone update wirelessly or using a computer. Ensure you have a strong internet connection and are connected to a power source before initiating the process.
Method 1: Updating an iPhone Wirelessly
Here are the steps to update your iOS wirelessly:
-
Step 1. Go to “Settings.”
-
Step 2. Open “General.”
-
Step 3. Choose “Software Updates.”
-
Step 4. Tap “Download and Install.”
Note: Your iPhone will download and install updates independently if enabled automatically.
-
Step 5. Enter “Passcode” and tap “Agree.”
This initiates the process. Once complete, your phone will automatically restart. Enter your passcode to regain access.
Method 2: Updating an iPhone Using a Computer
Below are the steps to update iOS using a computer:
-
Step 1. Plug your iPhone into the computer.
Use a cable to connect your phone to the computer and ensure a stable internet connection.
-
Step 2. Go to either “Finder” or “iTunes.”
If you use a Mac with macOS Catalina or later, go to “Finder.” But if you use a Windows computer, a MacOS Mojave, or earlier, open your “iTunes” app.
-
Step 3. Select “My iPhone” on the sidebar.
-
Step 4. Open “General” and press on “Update.”
Simply follow the prompt instructions to update your iOS system on your iPhone.
Learn more about How to Update iOS on iPhone.
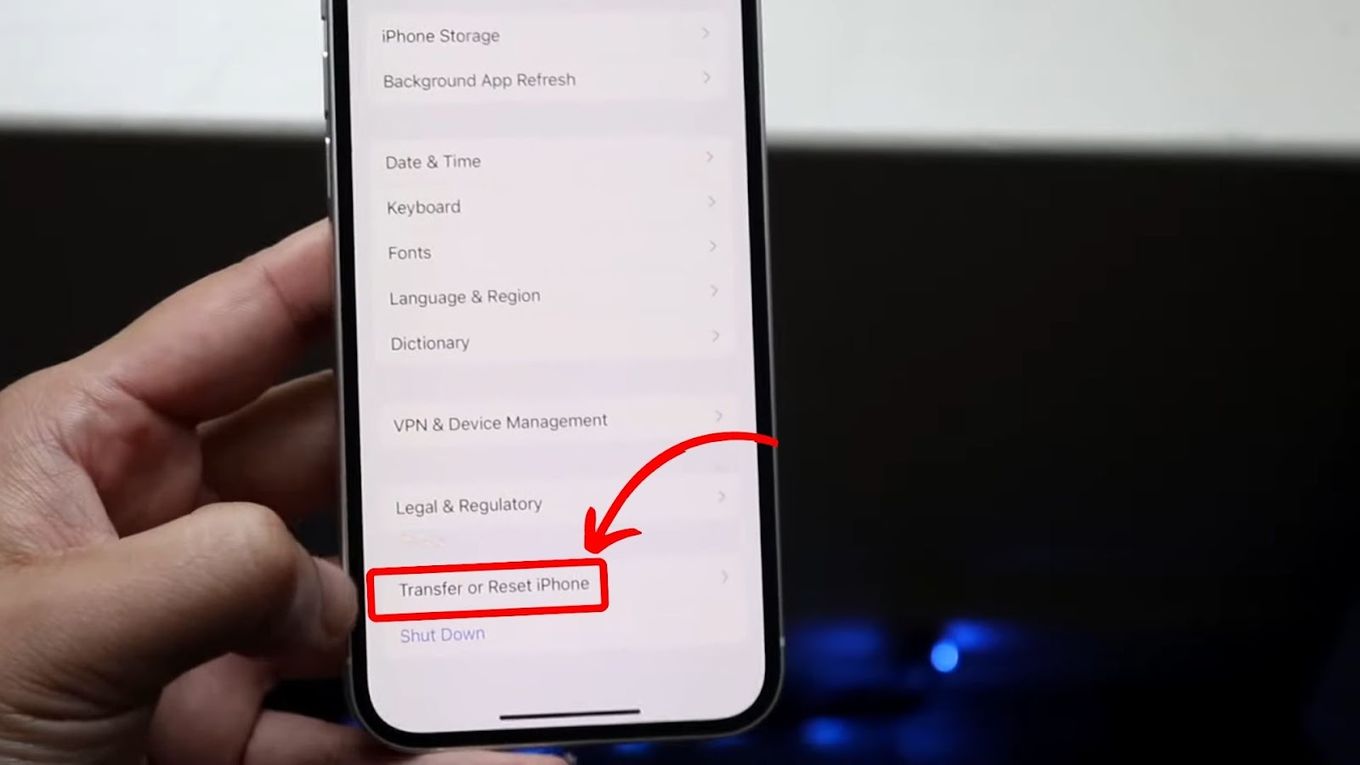
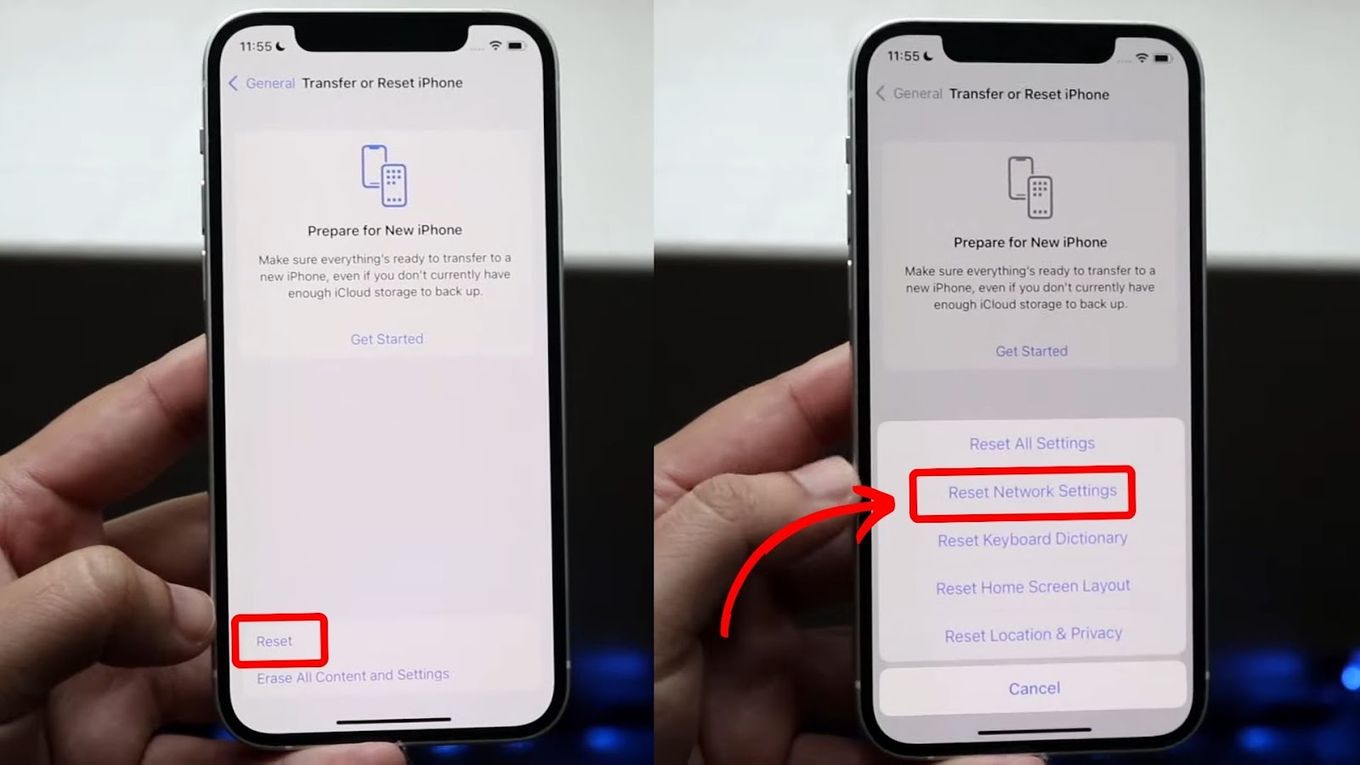
6. Check Your Network Setting
You can check your network setting for connectivity issues to turn off message blocking on your iPhone.
These are the steps to reset network settings:
-
Step 1. Open “Settings > General.”
-
Step 2. Scroll and tap “Transfer or Reset iPhone.”
-
Step 3. Tap on “Reset.”
-
Step 4. Press “Reset Network Settings.”
-
Step 5. Enter “Passcode” to start the process.
7. Re-insert Your Simcard
Here are steps to guide you on how to re-insert your sim card:
-
Step 1. Eject the SIM card tray.
-
Step 2. Remove and re-insert your SIM card.
-
Step 3. Return the SIM tray to your iPhone.
-
Step 4. Go to “Settings.”
-
Step 5. Tap on “Cellular.”
Confirm your network selection from the “Cellular” option. This is to ensure all SIM card settings are correct.

Learn more about Removing a Sim Card Based on your iPhone Model.
8. Confirm Your Cellular Plan Details
It is possible to get a “message blocking is active” error if you don’t have an active SMS plan. Cross-check your message quota with your network provider.
You can also opt for an unlimited plan if available. If you are on one, renew the subscription to continue enjoying messaging services.
9. Get in Touch With Customer Support
If you’ve tried all methods and none is working, you can always report to contacting your carrier or Apple’s customer support. You can contact Apple customer support through calls, online chat, direct messages on Twitter, or the Apple support app.
However, Have your iPhone serial number ready before contacting your carrier or Apple’s customer service. You can get it by going to “Settings > About > Serial Number.”
Moreover, you must first know your carrier to be able to contact them. If you don’t know your carrier, check their details from your phone by going to “Settings General > About > Carrier/ Network Provider.”
Once you get your carrier details, contact the customer support team to get help turning off message blocking on your iPhone.
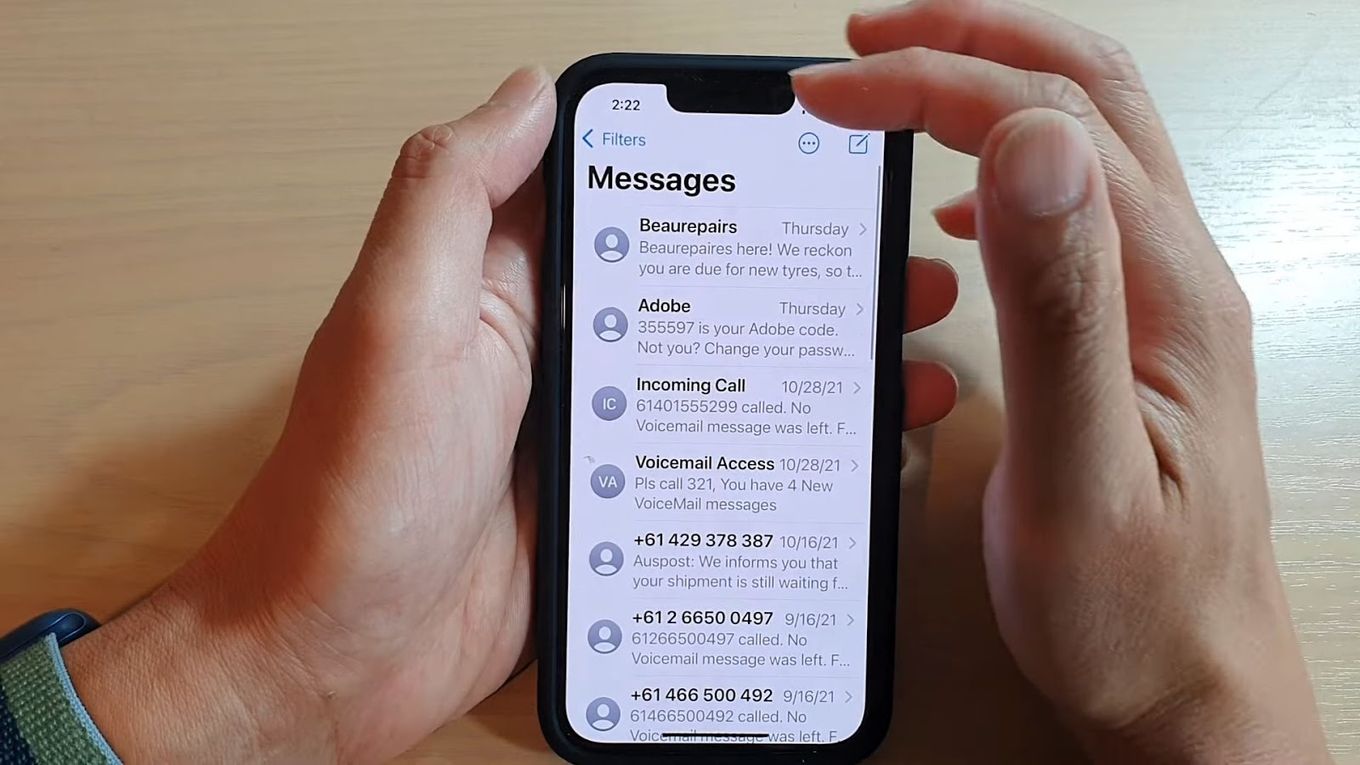
Can You See Blocked Messages on iPhone?
Yes, you can see blocked messages on your iPhone directly in the messaging app. The messages won’t pop up on your screen but will be stored in the “Unknown Senders” folder. This function is only available in iOS 16.5 or later. You can see all blocked numbers, promotional numbers, and spammers in this folder.
When a blocked number sends a text, the carrier or network transmits it to you. But since the sender is blocked on your side, the iOS hides the text from your phone’s interface.
Here are the steps to see blocked messages on an iPhone.
-
Step 1. Note the blocked number.
You can check the list of blocked contacts in your messages settings to confirm the blocked number.
-
Step 2. Open the messaging app.
-
Step 3. Tap on “Filters.”
Look for the filters icon at the top left corner of your iPhone. If message filtering is not turned on on your iPhone, go to “Settings > Messages > Filter Unknown Senders.”
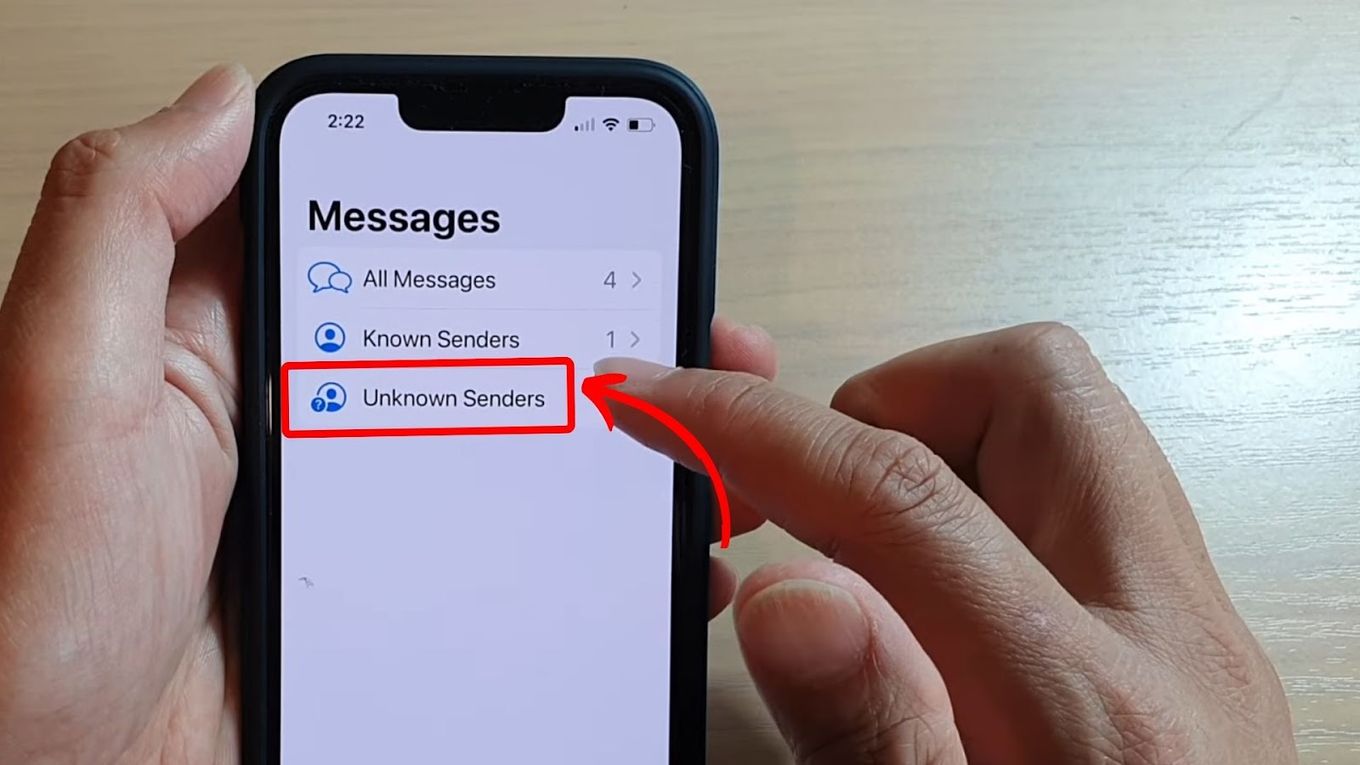
-
Step 4. Select “Unknown Senders.”
Check each message to find the text from your blocked number.
Discover how to see old calls history on iPhone and bypass the limit of 100 last calls.
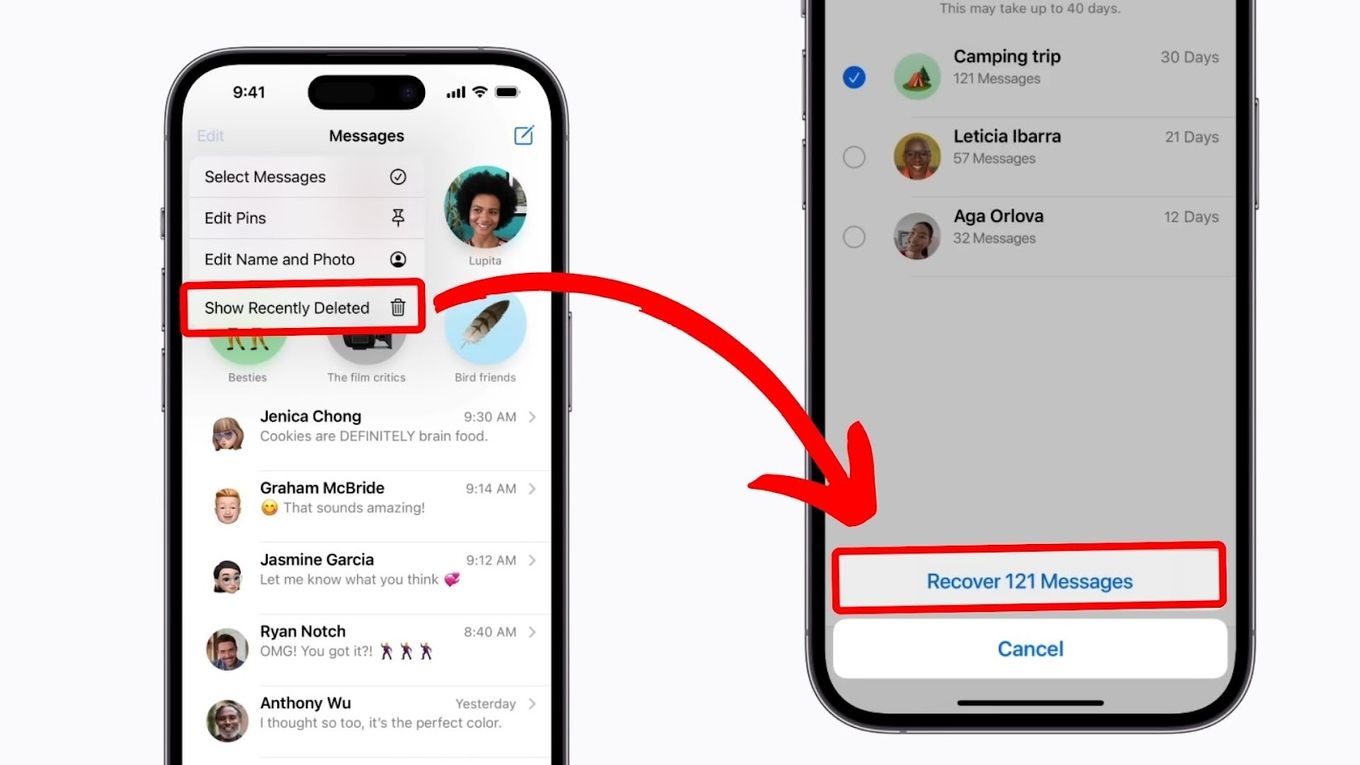
Can You Recover Deleted iPhone Messages?
Yes, you can recover deleted iPhone messages from iCloud. However, this only includes conversations that are backed up. The data not included in the recent backup gets erased. Deleted messages are only recoverable within 30 days before they permanently get deleted.
Here are the steps to retrieve messages from the messaging app:
-
Step 1. Open “Messages.”
-
Step 2. Tap “Show Recently Deleted.”
Look for this option on the top left corner of your screen and return to the conversation list.
-
Step 3. Choose the conversation you want to restore.
-
Step 4. Tap “Recover > Recover Messages.”
Learn more about Retrieving Backed Up Messages on iCloud.
You Can Turn Off Message Blocking on iPhone
You can try several methods to turn off message blocking on your iPhone. First, check if you have blocked the contact, and if so, unblock them. Next, you can turn off iMessage and reset the time and date settings.
Feel free to update your iOS and carrier settings. Sometimes network connectivity might be an issue, so check settings, confirm your plans, and if you’re not using an eSim, try to re-insert the sim card. Remember, if the problem persists, the customer support team is always available.


