Have you ever encountered the “Verify Contact Information” prompt while using your Apple Pay? Isn’t it such a hassle? Worry not, though, as other users have experienced this as well.
The Apple Pay “Verify Contact Information” error is a security feature Apple uses to safeguard its users’ confidential data. It appears when you use your Apple Pay to purchase something.
In this article, we’ll dive into why it happens and how you can fix it in case you encounter it, too.
Why Is Apple Pay Asking You to Verify Contact Information?
Apple Pay might ask you to verify your contact information if your billing address doesn’t match the one you used for the Apple Card or is incorrectly formatted. This prompt is a security measure to protect your information from unauthorized access and use.
This error appears when you try to confirm the payment using your Apple’s biometric authentication, such as Face ID or Touch ID. You won’t be able to pay using your Apple Pay unless you verify your contact information to fix the error.
How to Fix the “Verify Contact Information” Error on Apple Pay?
Follow these methods to fix the “Verify Contact Information” error:
Solution 1. Update Your Billing Address or Phone Number
There are several ways of updating your billing address and phone number using your Apple devices.
Method 1. Updating Billing Address & Phone Number via iPhone’s Settings
Here’s how to update your address and phone number on your iPhone:
-
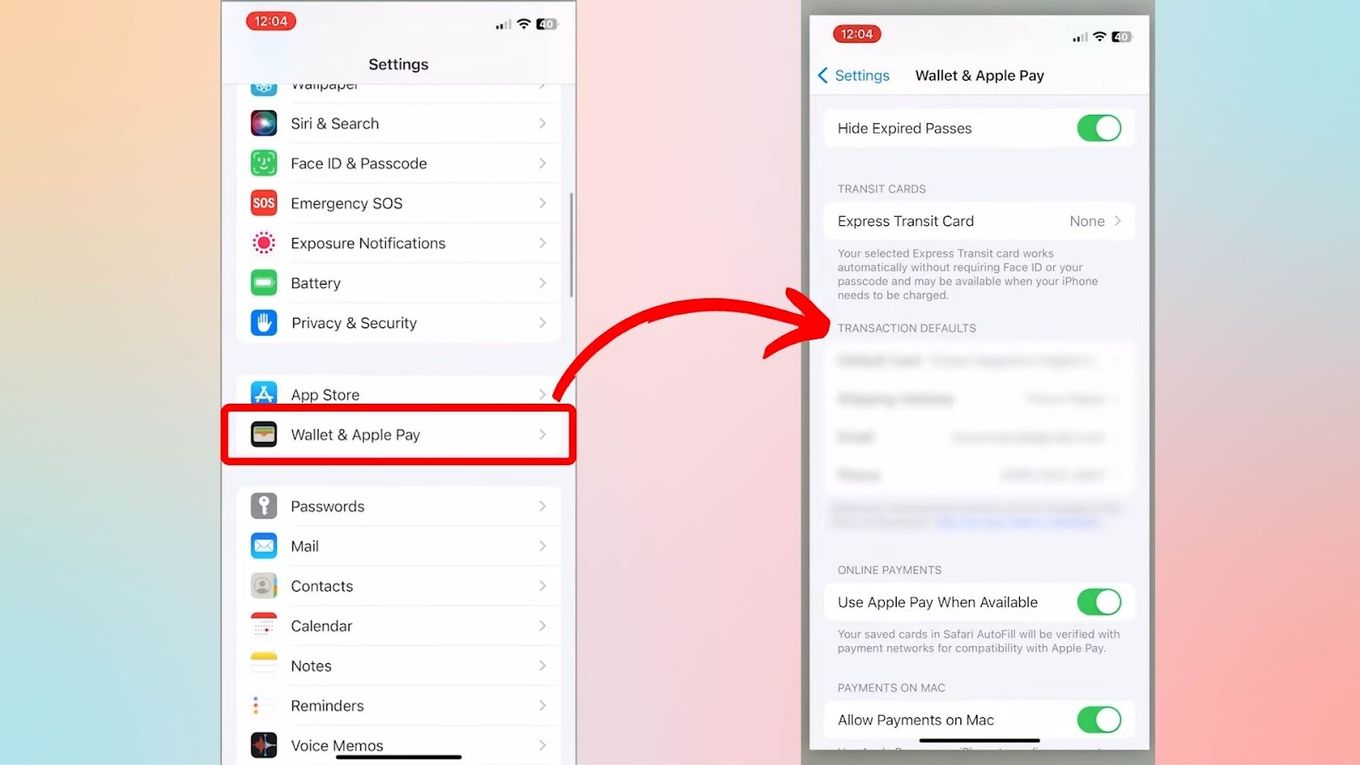
Step 1. Go to your “Settings.”
-
Step 2. Click “Wallet & Apple Pay.”
-
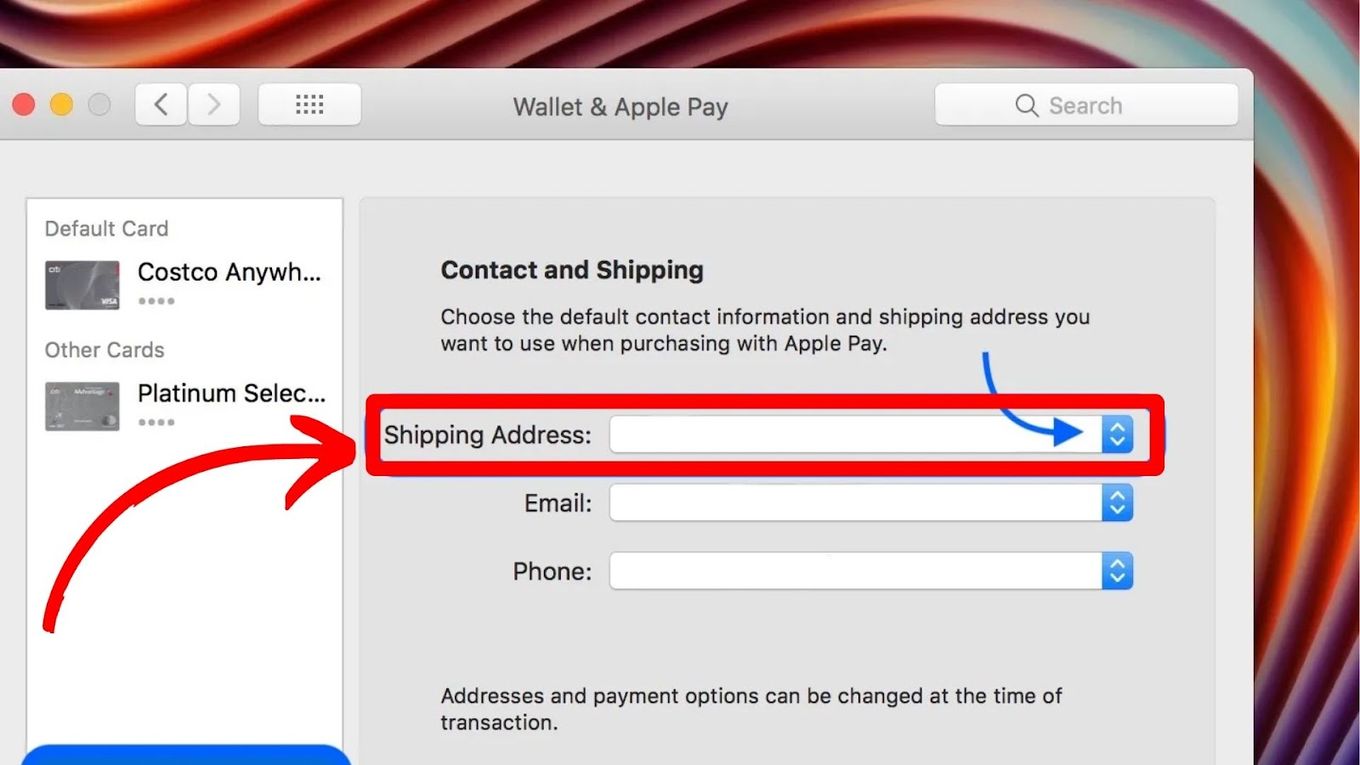
Step 3. Go to “Transaction Defaults.”

-
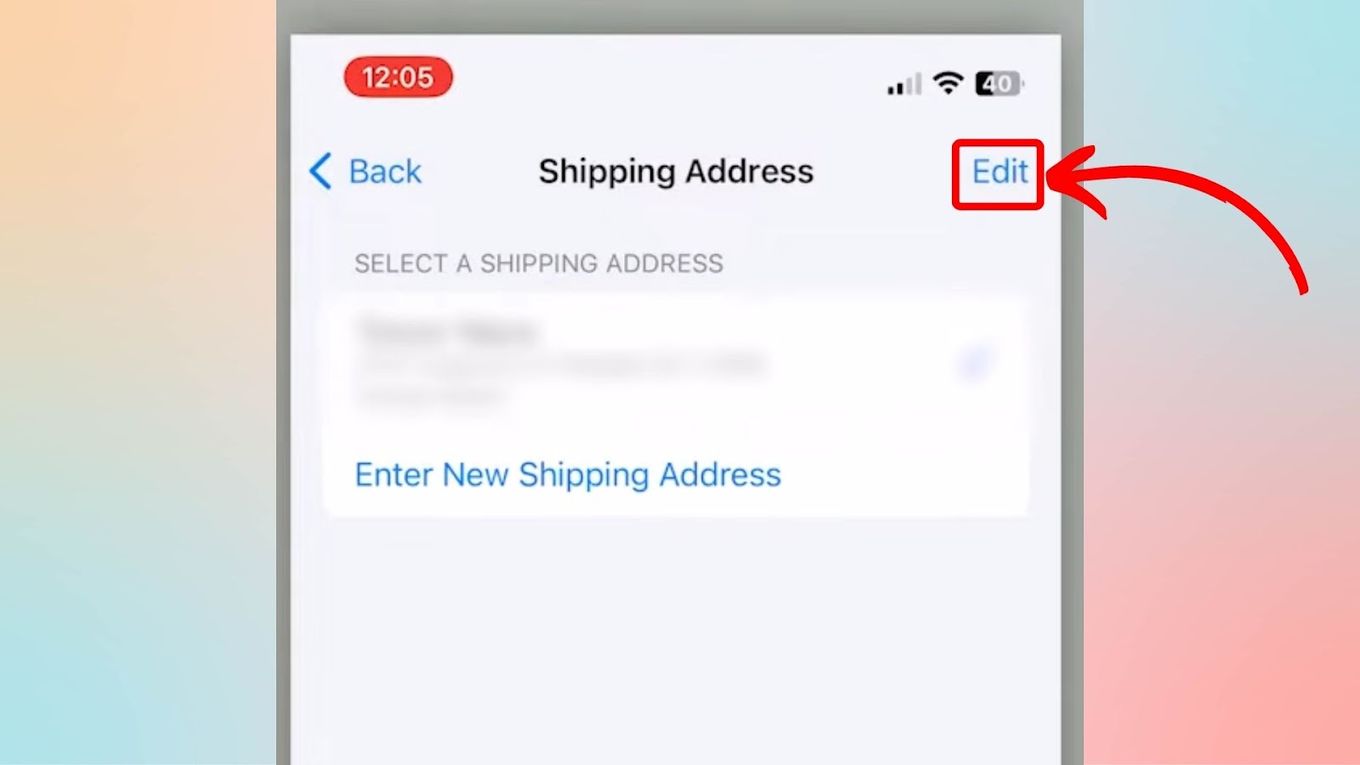
Step 4. Select “Shipping Address.”
-
Step 5. Tap on “Edit” to change your details.
-
Step 6. Once you’re done editing, tap the “back” button.
-
Step 7. Tap “Phone” and double-check if your phone number is correct.
Method 2. Updating Billing Address & Phone Number via Wallet App
-
Step 1. Open the “Wallet” app.
-
Step 2. Select the card you want to update.
-
Step 3. Tap the “three-dot” icon on your screen.
-
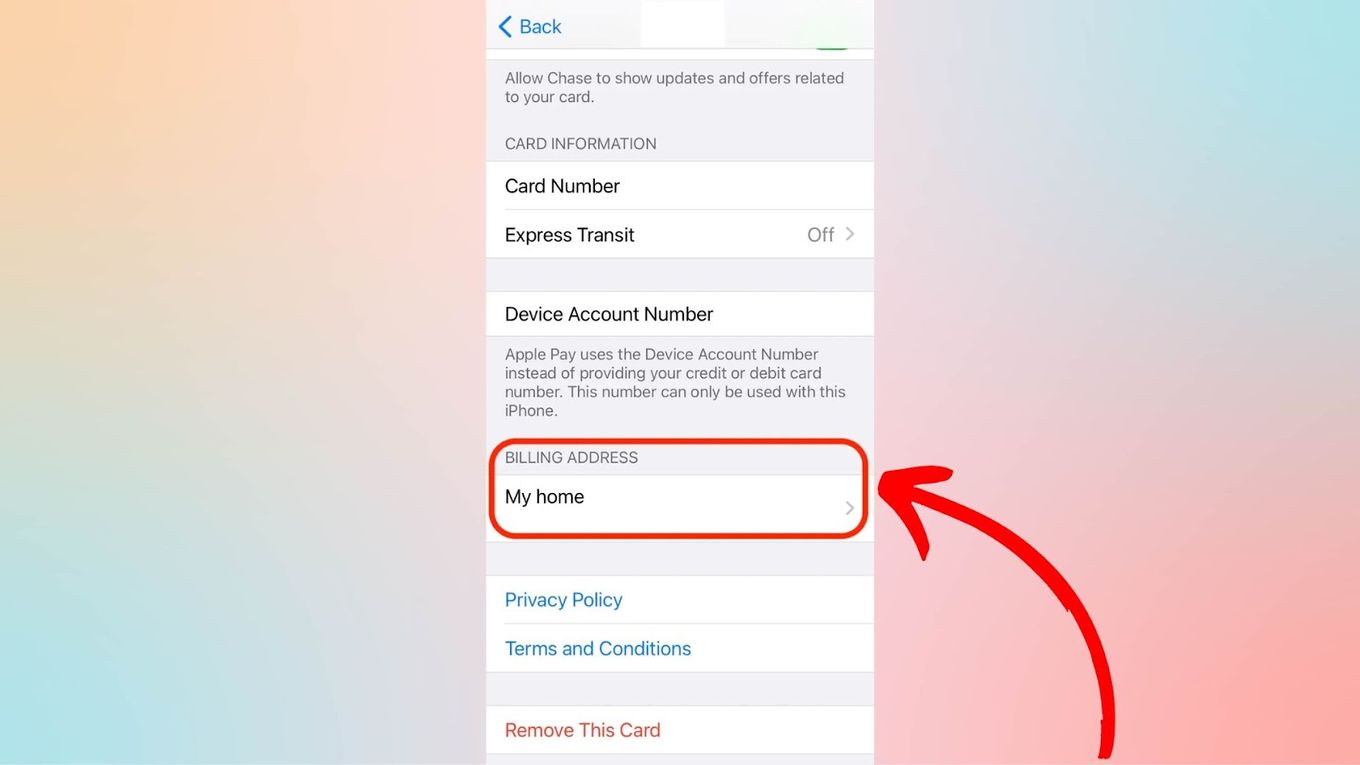
Step 4. Scroll down to find “Billing Address.”
-
Step 5. Tap “Edit” and type the correct address if needed.
Learn more about Updating Your Billing Address via the Wallet App.
Method 3. Updating Billing Address via Apple ID
-
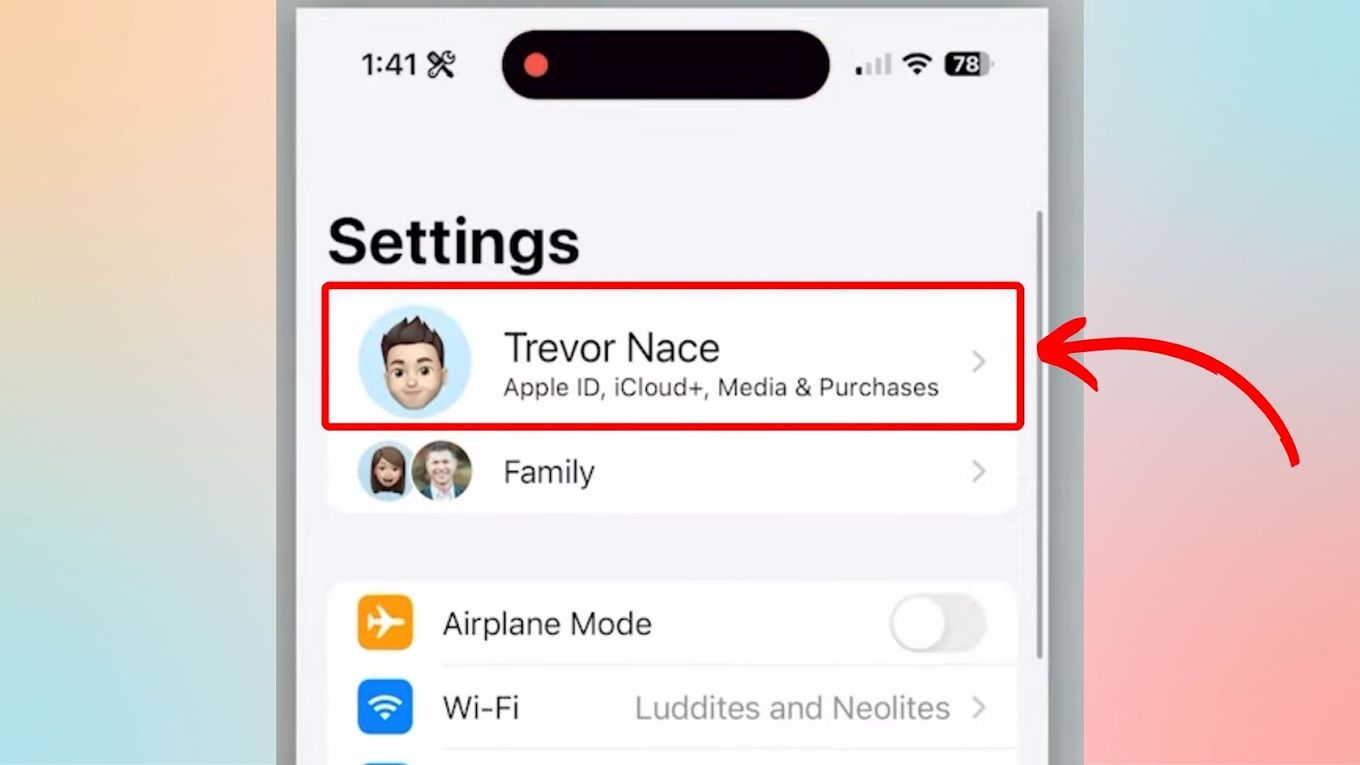
Step 1. Go to “Settings.”
-
Step 2. Tap on your name on the top part of the screen.
-
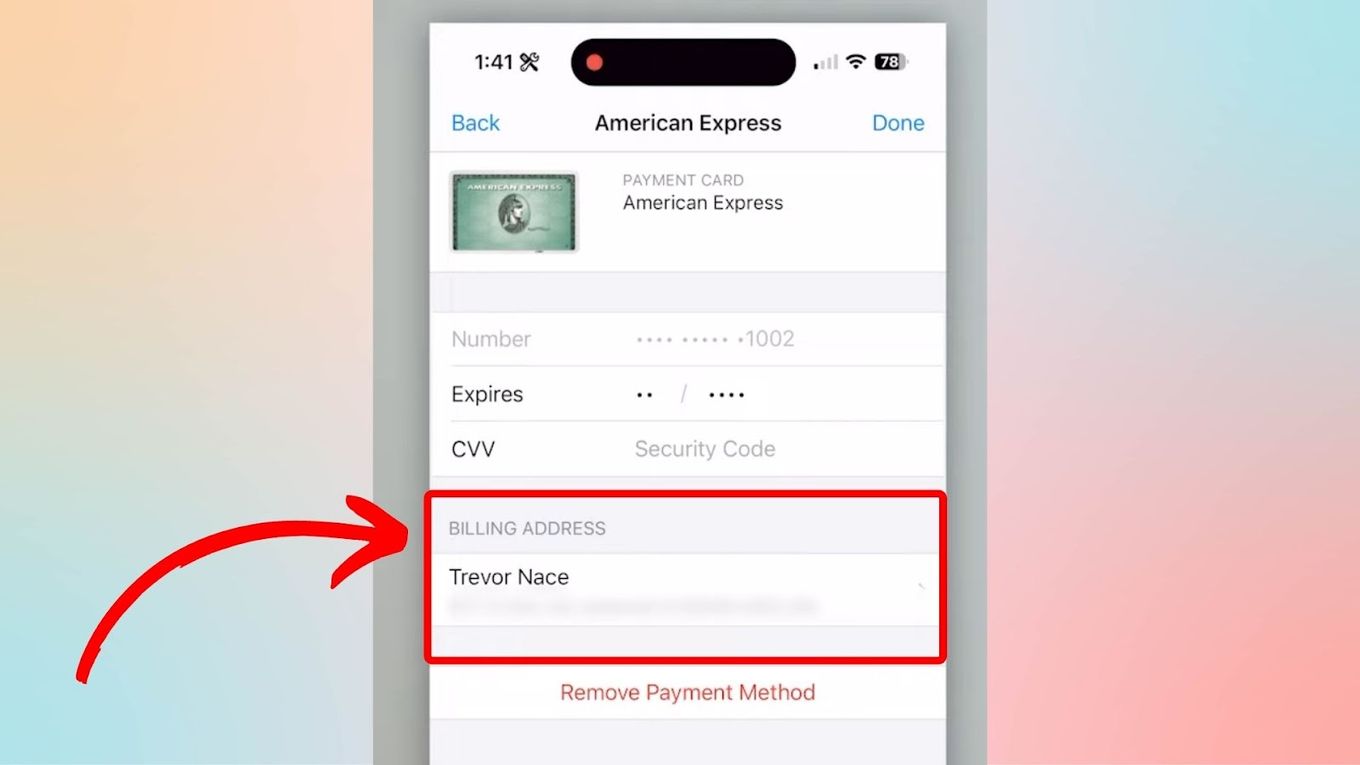
Step 3. Click “Payment & Shipping.”
-
Step 4. Look for “Payment Method.”
-
Step 5. Tap on the card you want to edit.
-
Step 6. Check your “Billing Address.”

Method 4. Updating Details on Your Mac
Here are the steps to update your address using your Mac:
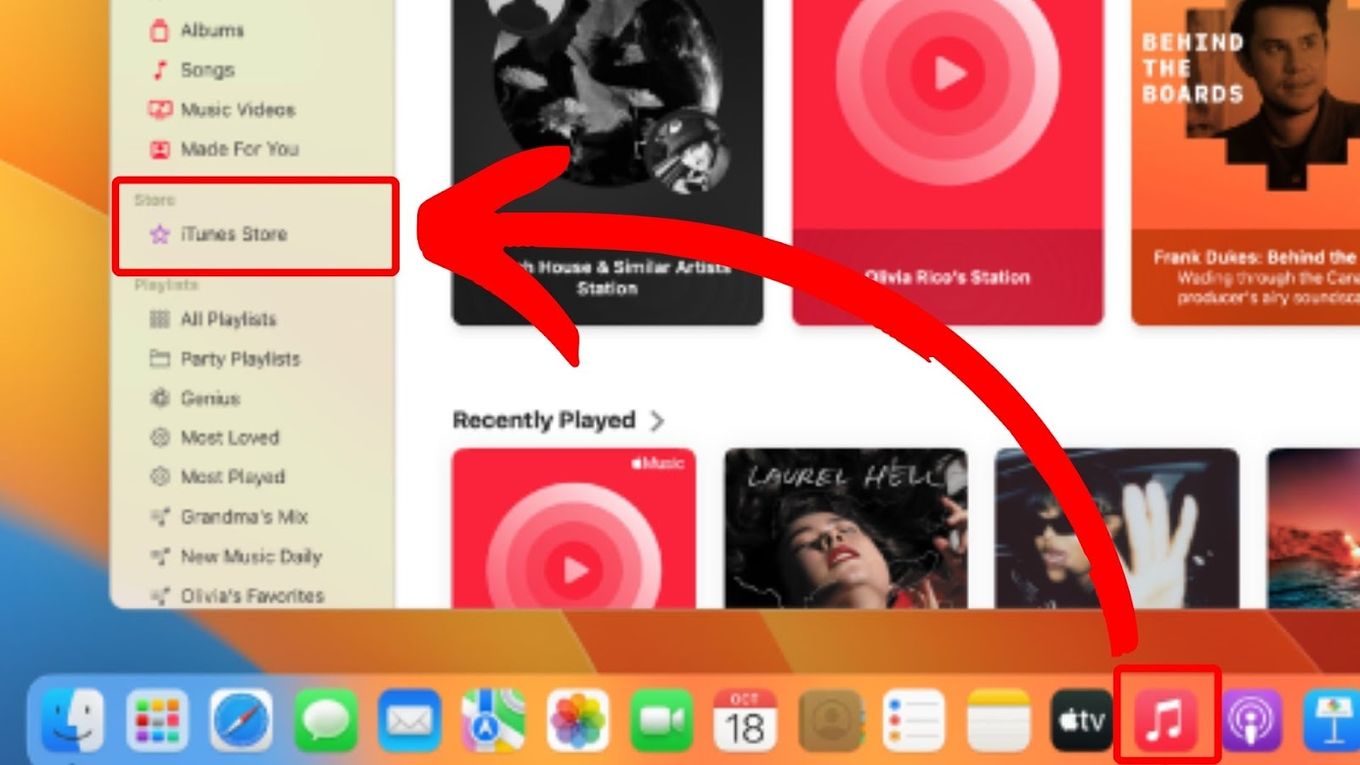
-
Step 1. Go to “Music.”
-
Step 2. Tap “iTunes Store.”
-
Step 3. Go to “Account.”
-
Step 4. Sign in to your account.
-
Step 5. Select “Address” and change if needed.
If the above steps don’t fix the issue, you can try the following solutions.
Solution 2. Check If the Apple Pay Server Is Down
Sometimes, the “Verify Contact Information” error in Apple Pay is due to downtime. This only happens in rare cases during maintenance.
Here’s how to check if Apple Pay is down:
-
Step 1. Open your web browser.
-
Step 2. Go to “Apple Support System Status.”
-
Step 3. Scroll down and look for “Apple Pay & Wallet.”
-
Step 4. Check if the circle beside it is green or red.
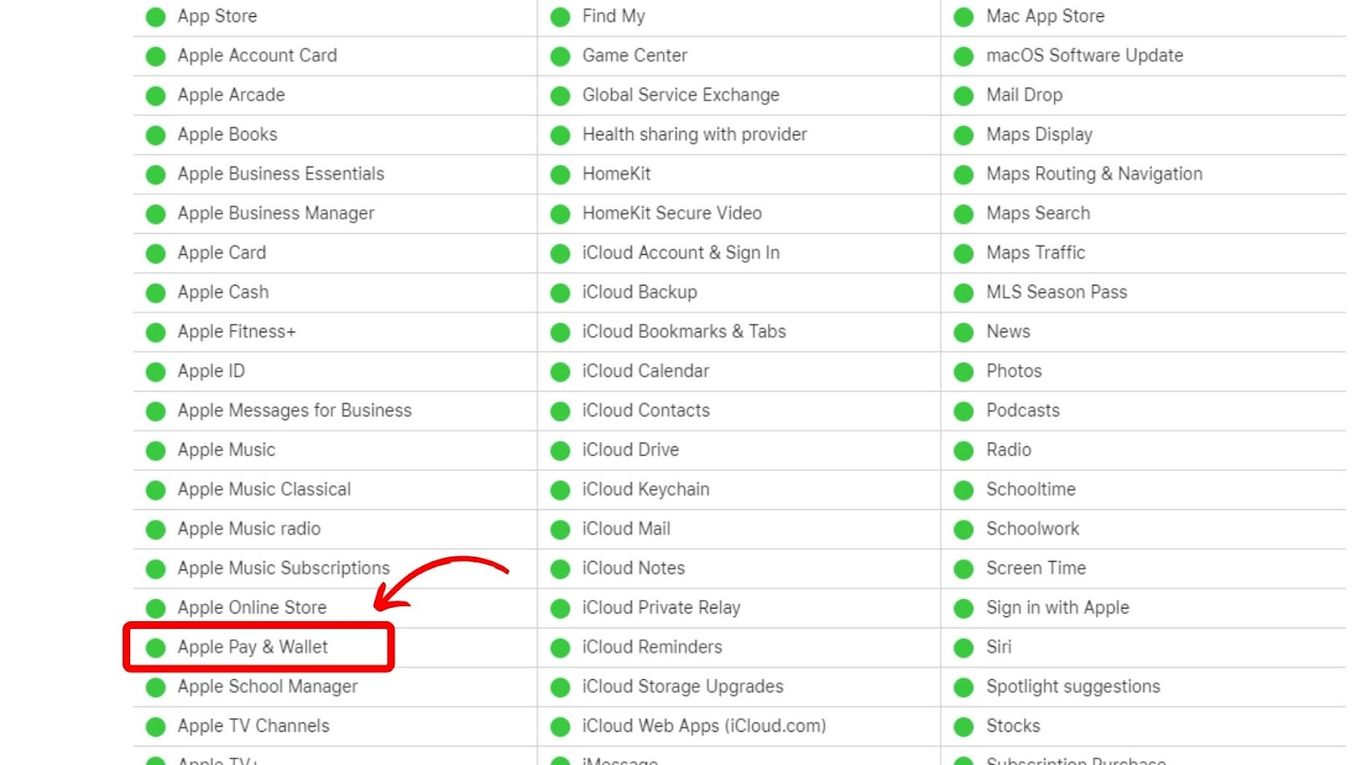
If it’s green, it means the system is up. If it’s red, then it’s probably undergoing maintenance. When Apple Pay is under maintenance, you’ll need to wait for the service to come back up again.
Solution 3. Contact Apple Pay Support
If the previous methods still can’t fix the “Verify Contact Information” prompt on your Apple Pay, you might need to contact Apple Pay Support to help you.
Here are the options that Apple provides if you are experiencing issues with Apple Pay:
-
Apple Communities.
This is where users raise or ask their concerns when facing specific errors. You can check if other users have encountered the “Verify Contact Information” error and if they could fix it. -
Tech Support.
You can access this via web browsers. You can also sign in to your account so Apple can personalize the service. -
Apple Support App.
Alternatively, you can download the app on your Apple device to access support via a web browser. This way, you can easily access support cases and get notified of your support case status.
Apple offers various ways to get in touch with its support team. But if you want to go to a physical store, you can visit an Apple Authorized Service Provider or Apple Store nearby.
How to Verify Payment Information on Apple Pay
When updating your Apple ID details, Apple Pay might show you a “Verify Payment Information” prompt.
These are the ways you can verify payment information on Apple Pay via iPhone or iPad:
-
Check Your Internet Connection.
Sometimes, our internet connection is down so Apple Pay won’t work correctly. Check if your connection is stable to fix the issue. Checking your connection will help refresh and update your information on the cloud. -
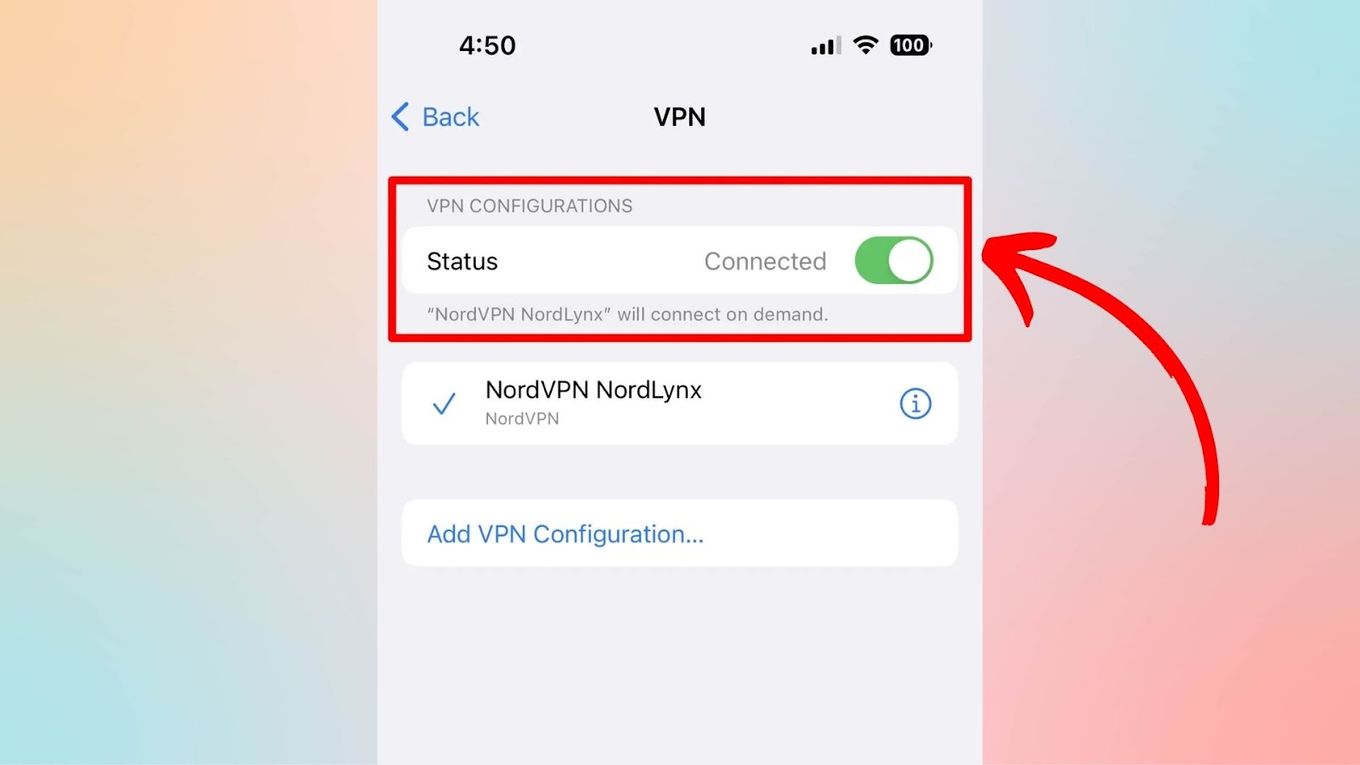
Disconnect VPN.
Your Apple Pay might not also work if you’re connected to a VPN due to security issues. Disconnect any enabled VPNs to fix the “Verify Payment Information” prompt. -
Check & Remove Overdue Subscriptions.
Apple Pay regularly checks if your card is still active. It will only let you pay for items if your payment information is updated. When you check and remove overdue subscriptions, you can validate that you’re still an active user with valid payment credentials. -
Update Your Payment Method.
If your card is inactive, you must update your payment method. When you do this, you can also automatically pay for overdue subscriptions. Apple Pay won’t work correctly if you don’t update your details.
If it’s still not fixed, you can check if your country/region is correct by going to “Account Settings”. You might also need to enter your card’s CVV so Apple can verify that your card is still active.
Note: When you change your payment method, it might take 1 to 3 business days to process.
Why Can’t You Verify Your Apple Pay?
Here are some reasons why you can’t verify your Apple Pay:
-
Unsupported Region.
Sadly, there are some regions that Apple Pay doesn’t support yet. Check the list of countries and regions supporting Apple Pay to ensure it will work. -
Bank Doesn’t Support Apple Pay.
Some banks don’t support Apple Pay. If so, you might choose another card supporting Apple Pay. -
Wrong Information.
You won’t be able to verify your Apple Pay if you enter incorrect information about you. Ensure your details are correct so you can successfully verify your Apple Pay.
Once you’re done checking the above, try to verify your Apple Pay again.
You can also try this Identity verification for Apple Card or Apple Cash from Apple.
What to Do When Apple Pay Is Not Working
If your Apple Pay doesn’t work, you can try these simple tips to troubleshoot it:
-
Restart Your Device.
Sometimes, your iPhone needs a restart so the updates can go through. Press simultaneously the Volume Up and Side buttons to power it off. Then, turn on your device after a few moments. -
Make Sure You Have a Card.
Go to “Settings > Wallet & Apple Pay > Payment Cards” to check if your card is linked to your Apple Pay. You can also replace your card if it’s no longer active. -
Sign Out & Sign In to Apple ID.
Before you do this, make sure you remember your Apple ID credentials. Go to Settings, click your name on the upper part of the screen, then Sign Out. You just need to sign in again after a few moments.
How to Set up Apple Pay From The Scratch
Apple Pay is a digital wallet that lets you buy stuff online, in-app, or physically. You can conveniently carry your phone and pay for anything using your Apple Pay. You can also use it to send money in the iMessage app.
These are the steps to set up your Apple Pay:
Step 1: Click Your “Wallet” App
#Download Wallet App#(https://apps.apple.com/au/app/apple-wallet/id1160481993)
Step 2: Press the “+” Icon

Step 3: Scan Your Card
You can add a debit or credit card, transit card, driver’s license, or state ID.
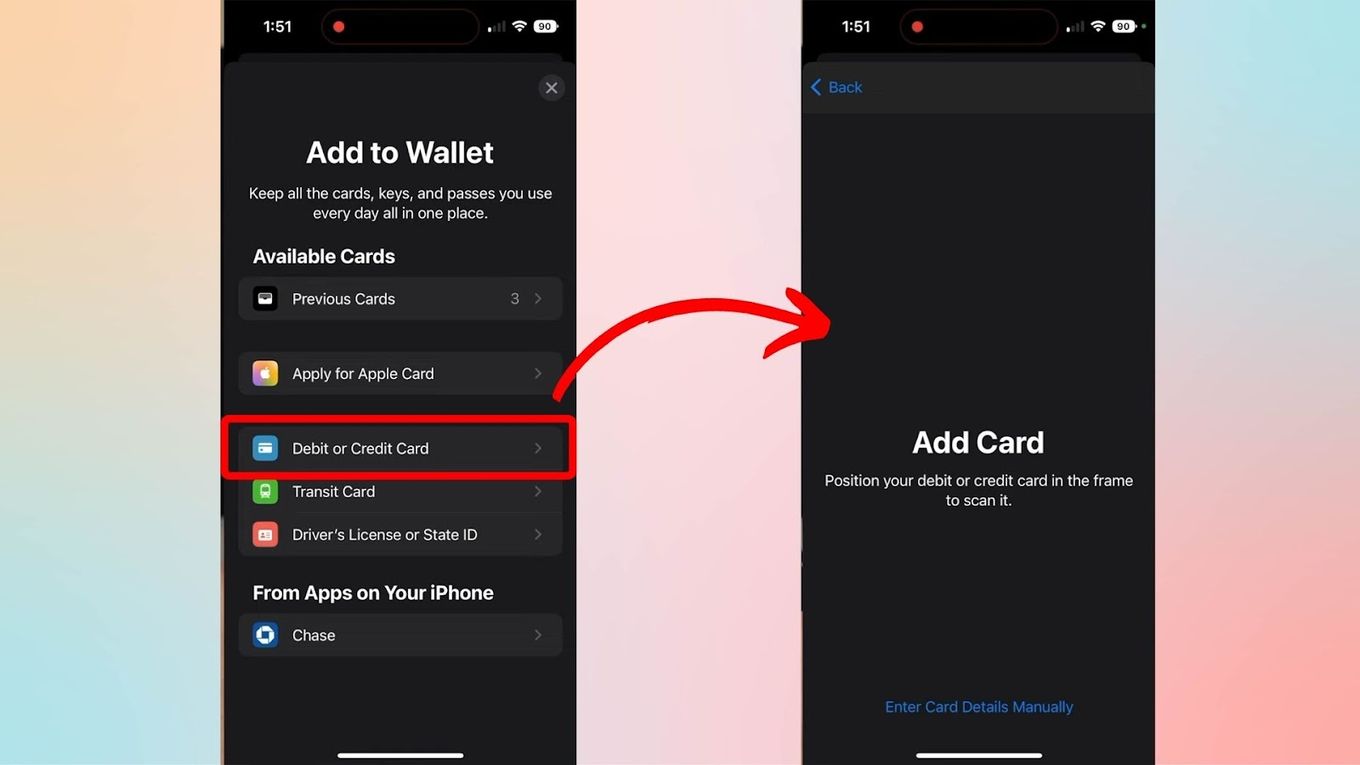
Step 4: Follow the Succeeding Instructions in Your Wallet App
Confidential details such as your card number and security code will be requested. Just go ahead and provide those. Once done, accept the Terms and Conditions and wait for your card to be approved.
Learn more about Apple’s Wallet App.
Apple Pay Contact Information Verified
Now that you know some hacks for verifying your contact information on Apple Pay, it’s easier to fix if you encounter it again. Apple Pay is a secure and convenient way to buy things, so it would be nice if yours is activated and working correctly.
Like other tech innovations, Apple devices can also experience errors, such as the contact information verification prompt, so be patient and wait for it to be fixed.


