Chromebooks have become increasingly popular due to their ease of use and affordability, making them an excellent choice for professionals and students. However, with the limited storage space, users may need to rely on external storage options such as SD cards.
If you need to use your SD card, formatting it as internal storage is vital to free up space and prepare it for use on other devices or receive files. Formatting an SD card on Chromebook is an easy process that can be completed in a few steps.
Read on for a step-by-step process on how to format an SD card on Chromebook. We will also explain what to do before formatting an SD card.
How to Format an SD Card on Chromebook?
Chromebook gives you one of the simplest ways to format your SD card since it’s available in the Chrome OS file manager. It is a simple process, and you can quickly format your SD card without needing a third party.
These are the steps to format an SD card on Chromebook:
Step 1. Plug Your SD Card Into Your Chromebook
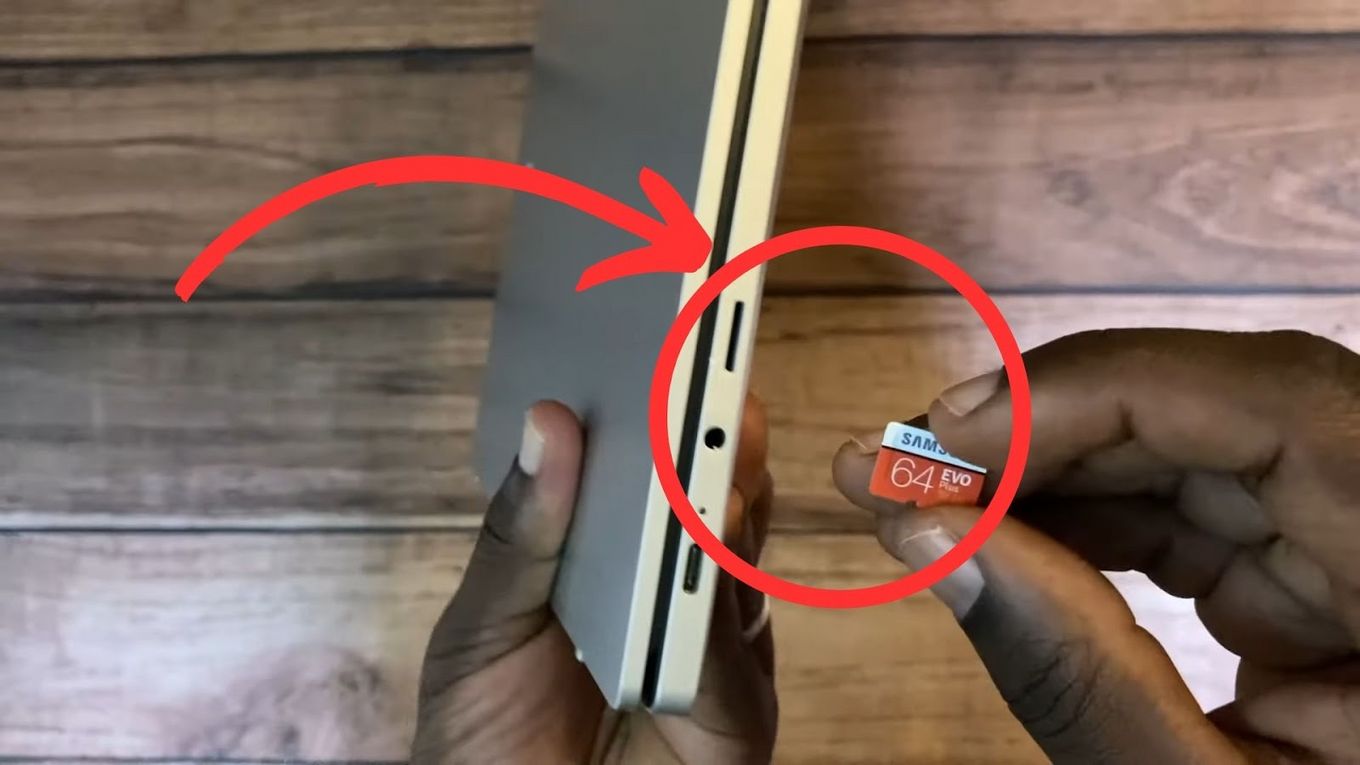
Note: Although most Chromebook models have specific SD card slots, in some models you may need a docking station or an SD card reader to plug your SD Card.
Step 2. Open the Files App
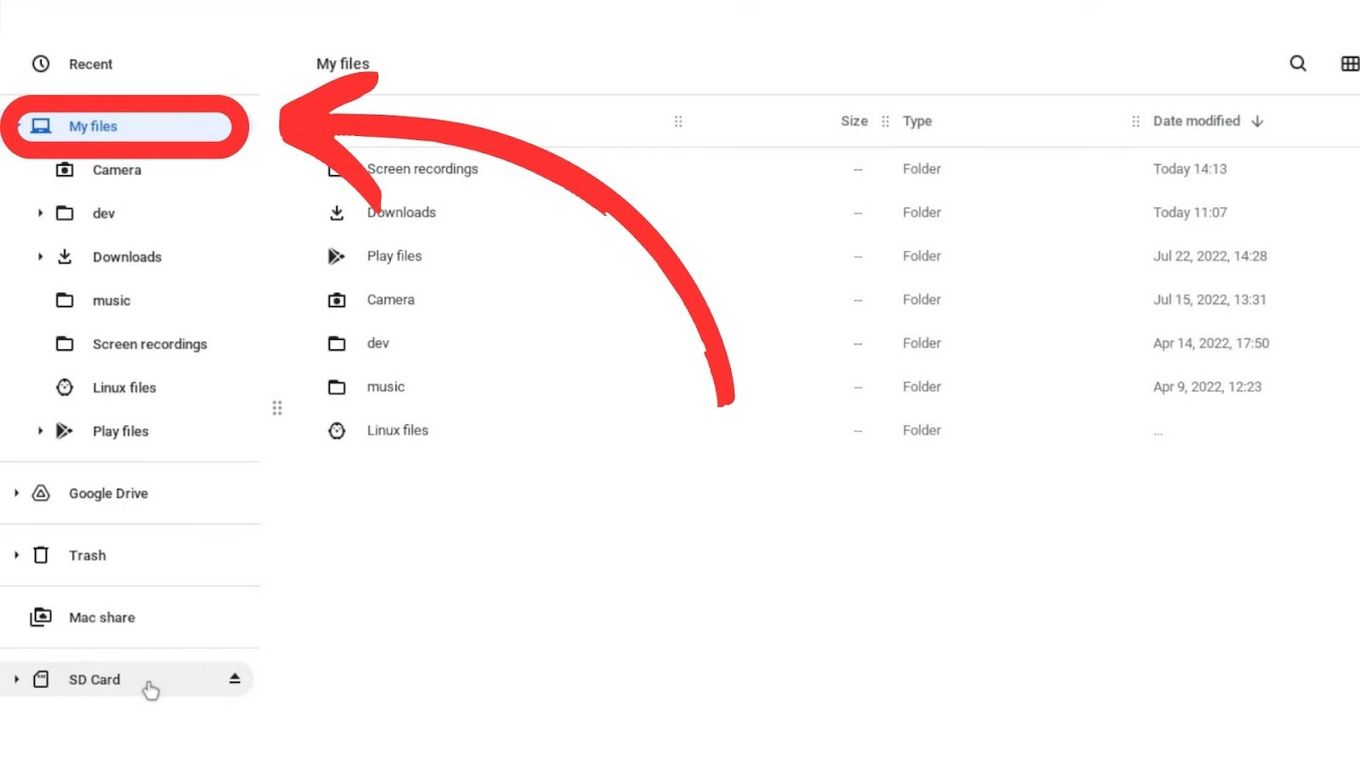
You can find this App on the taskbar or in the app launcher.
Step 3. Click on the SD Card Name
You will find it at the bottom of the left navigation panel.
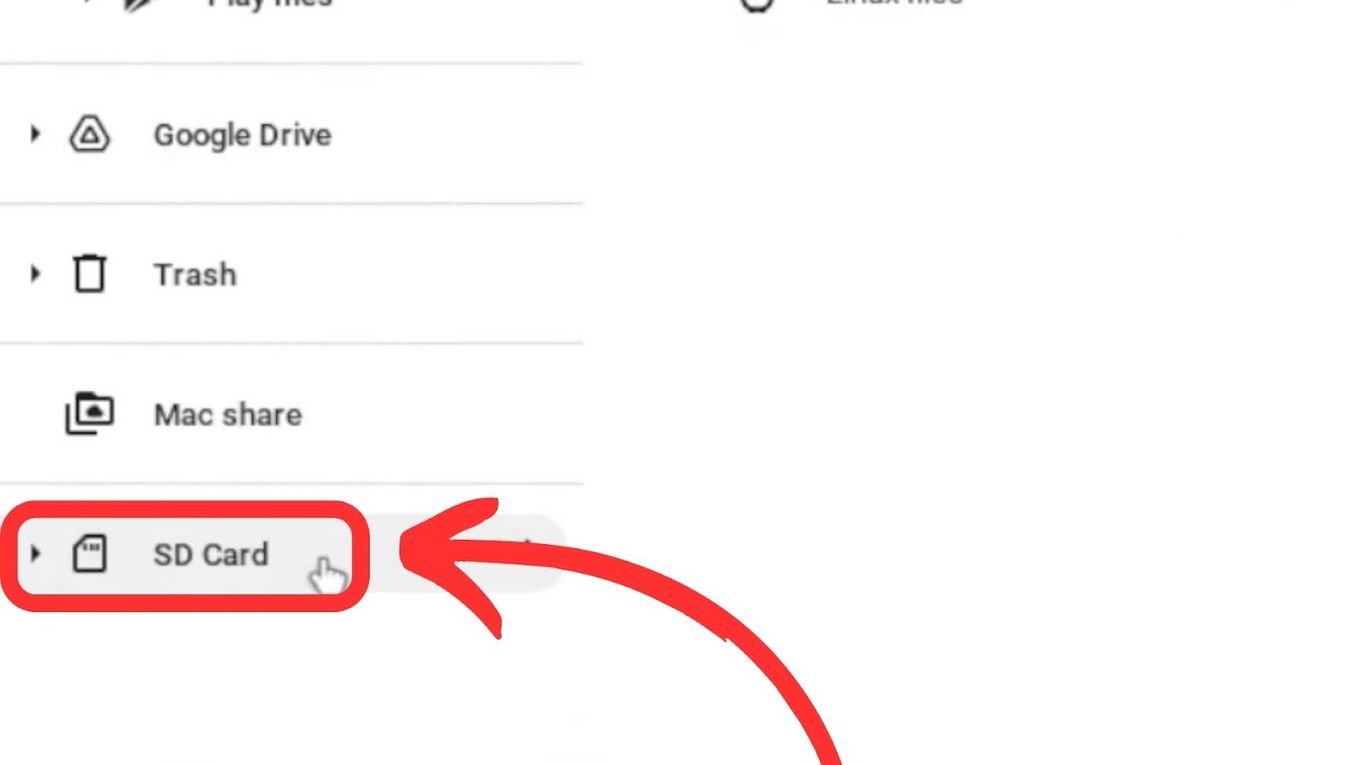
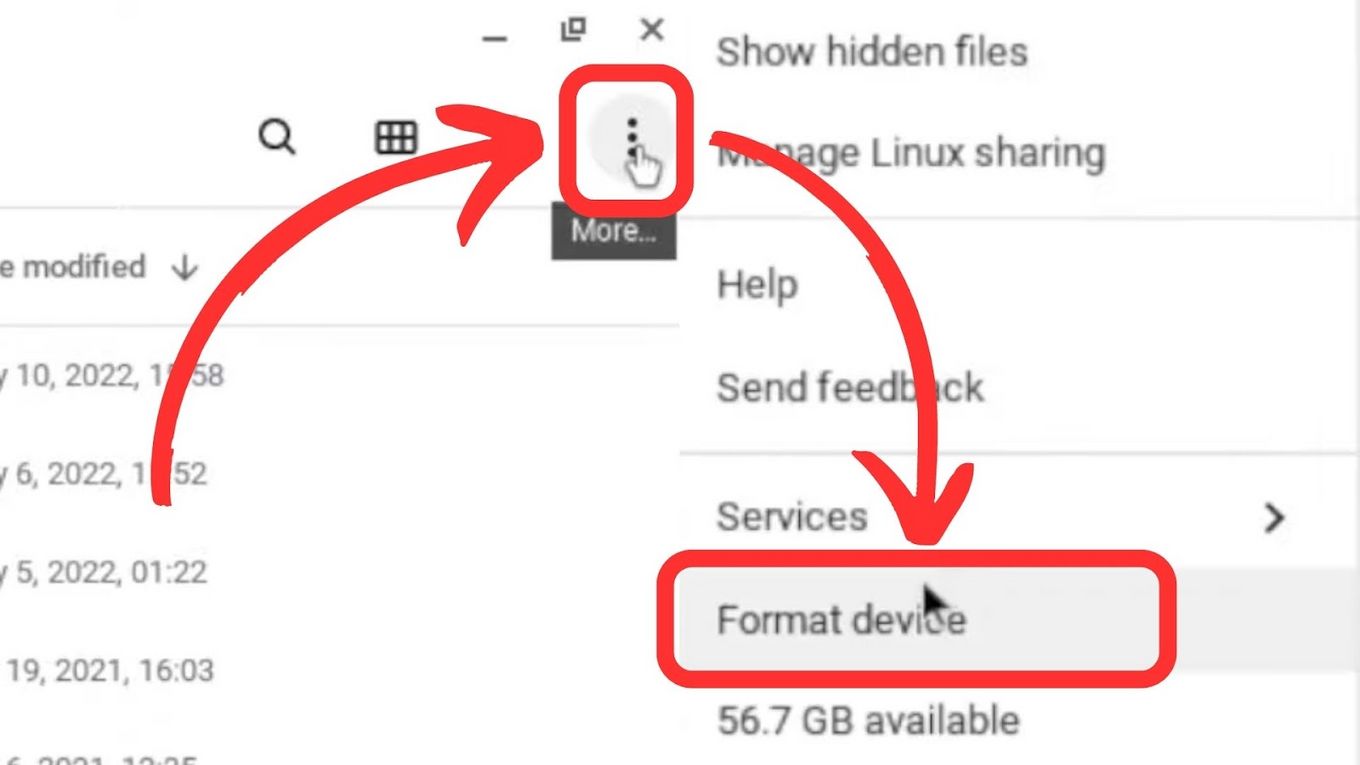
Step 4. Click the “Three Dots” Icon & Select “Format Device”
The three dots icon (“More…”) is at the top right corner of the window.
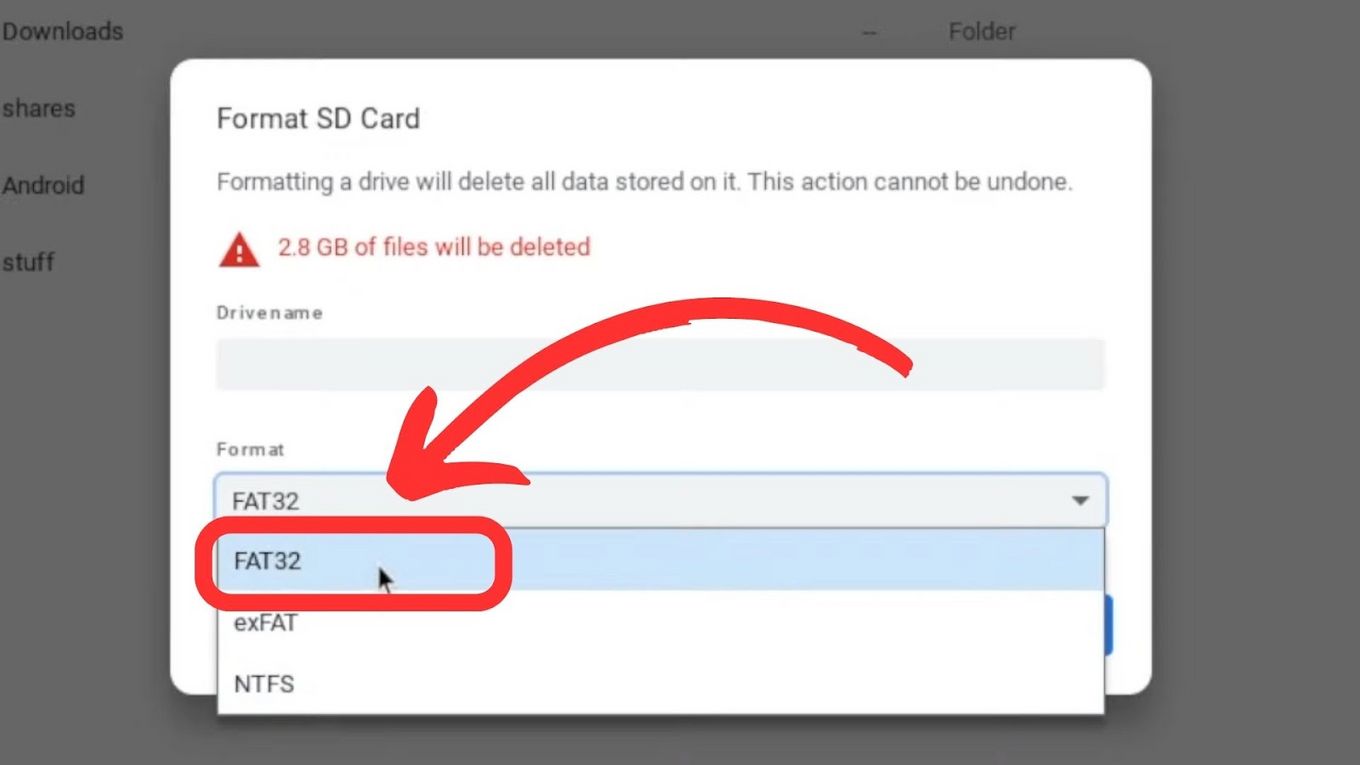
Step 5. Configure Your SD Card Name & Format
You can select between FAT32, exFat or NTFS formats.
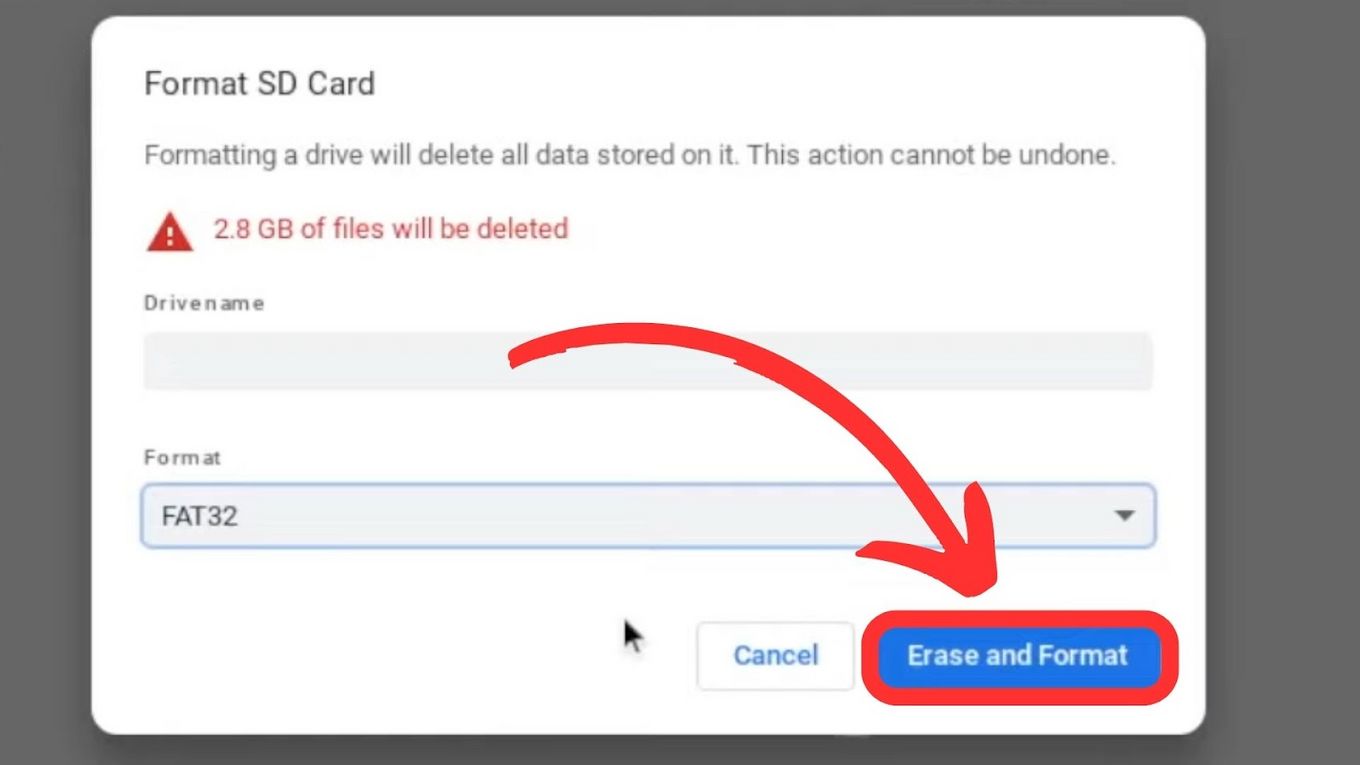
Step 6. Click “Erase and Format”
Do not unplug the SD card while this process is running.
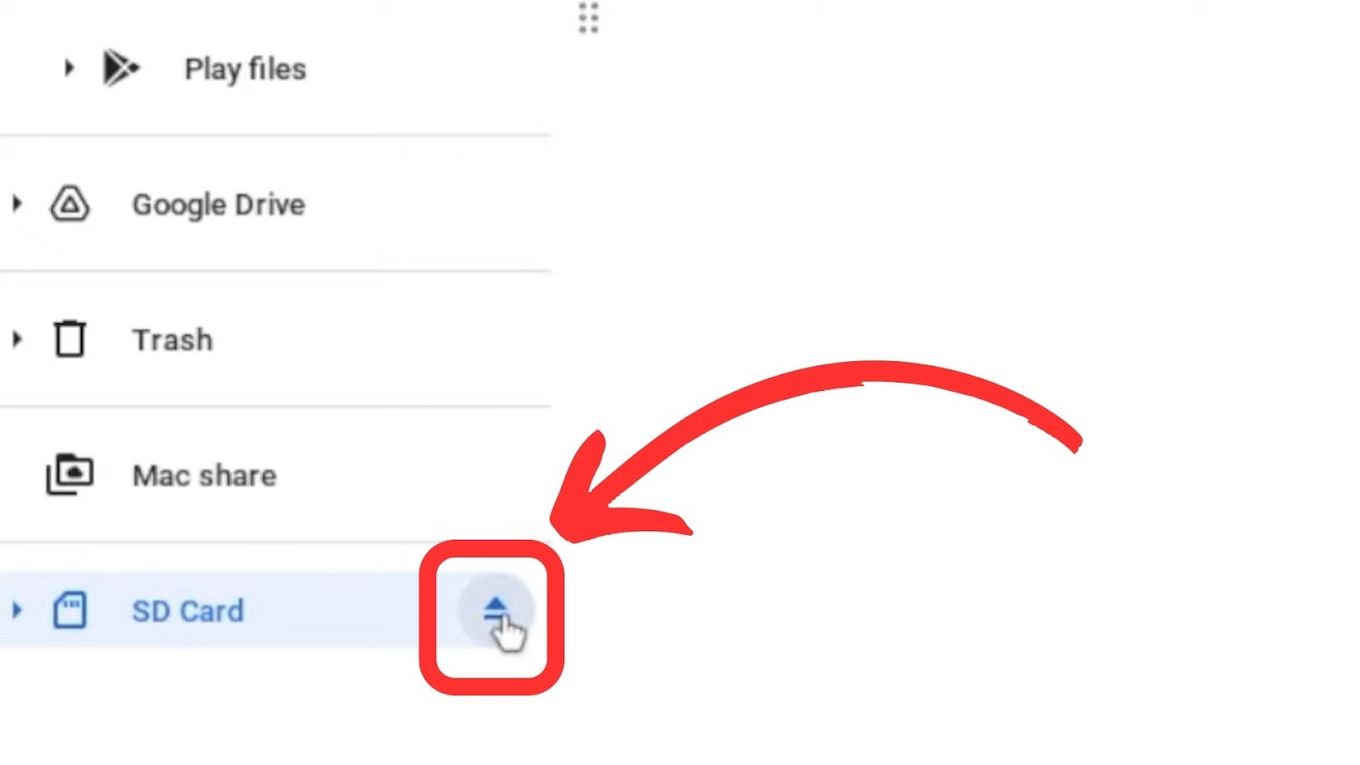
Step 7. Click the “Eject” Icon & Remove Your SD Card
What to Do Before You Can Format an SD Card on Chromebook?
Before you can format an SD card on a Chromebook, there are a few things to consider to ensure you safely erase data and quickly recover it when needed. Here is what you can do before formatting:
-
Check the Compatibility of Your File System.
Ensure you choose the right file system format for your SD card to avoid potential compatibility issues with your device. For instance, exFAT or FAT32 is most viable if you use a Microsoft file system, while NTFS works best for Mac systems. -
Check for Any Firmware Updates.
Verifying firmware updates may ensure reliable and excellent performance when using your device with huge files or applications. Also, it can fix bugs and even improve the stability of your device. Not checking the firmware updates can lead to formatting errors. -
Remove Your SD Card Correctly.
Before removing your SD card from your Chromebook, safely eject it to avoid data loss, corruption of files, or even damage to the SD Card itself. Furthermore, it ensures the read-and-write process of the card is complete. -
Backup Your Important Data.
Formatting can lead to data loss which may sometimes be irrecoverable. When you format, your device erases everything, so it’s important to back up important data to minimize the risk of losing it. Backup ensures your valuable data remains safe.
What Is the Best Format for an SD Card on Chromebook?
The best formats for an SD Card on a Chromebook are FAT32 or exFAT. FAT32 is better for compatibility issues, while exFAT is better if you want to store files bigger than 4GB. Note that the FAT32 format has a limited size file of 4GB. Chromebook also supports other formats such as NTFS, which is more common for large drives.
FAT32 is well suited for small-capacity memory devices such as memory cards and USB Drives. Although it has limited writing and reading speeds compared to NTFS, it is the most common format for SD Cards.
Can You Restore a Formatted SD Card on Chromebook?
You can’t restore a Formatted SD Card on your Chromebook. However, you can still recover the files by plugging your SD Card into your Mac or Windows Computer and using a Software Recovery Tool. Unfortunately, there isn’t yet any recovery tool software for Chromebook yet.
There is an extension called “Chromebook Recovery Utility“, but this tool can only create a recovery SD Card or drive to restore your Chromebook, not to restore your formatted SD card.
Even with a software recovery tool, there is no guarantee that the data can be fully restored. As such, it is crucial to backup up your important data and regularly check the condition of your Computer and SD Card.
How to Fix an SD Card Not Reading on Chromebook?
Chromebooks are powerful, effective, and convenient. Although, like nearly all forms of technology, various problems may arise, including an SD card not reading. To fix such, here are the possible solutions:
Solution 1: Update Your Chromebook OS
Updating your Chromebook is a straightforward process. To update, follow the below steps:
- Step 1. Click on the time icon and select the “Settings” icon.
- Step 2. Click the “About ChromeOS” option.
- Step 3. Click on “Check for Updates”.
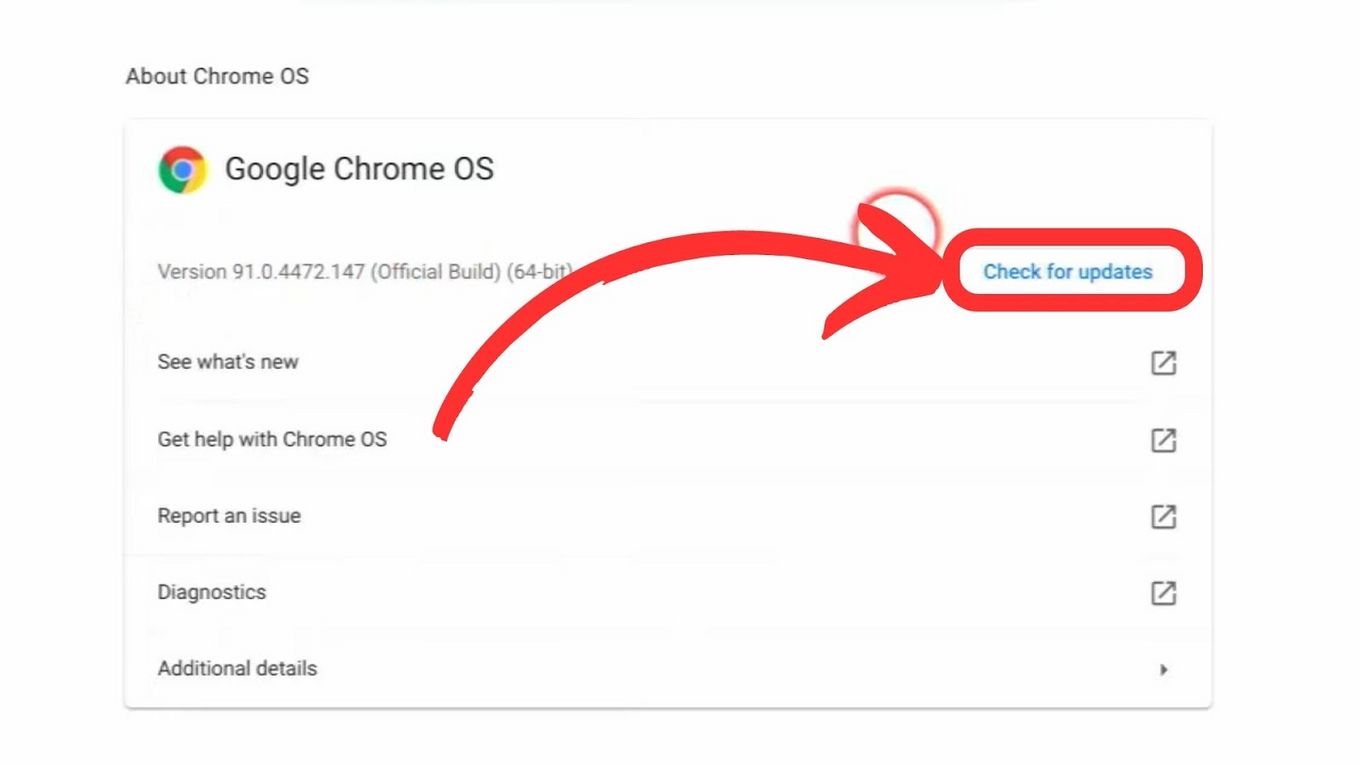
For more information, check this Chromebook simulator on how to update your Chromebook’s operative system.
Solution 2: Reset Your Chromebook Hardware
To fix some Chromebook problems, like a problem with an SD Card, you may need to reset your hardware, commonly known as a hard reset. In most Chromebooks, you can use the below steps to hard reset:
- Step 1. Turn off your Chromebook.
- Step 2. Click and hold the “Refresh” + “Power” buttons simultaneously.
- Step 3. Release the buttons when your Chromebook powers on.
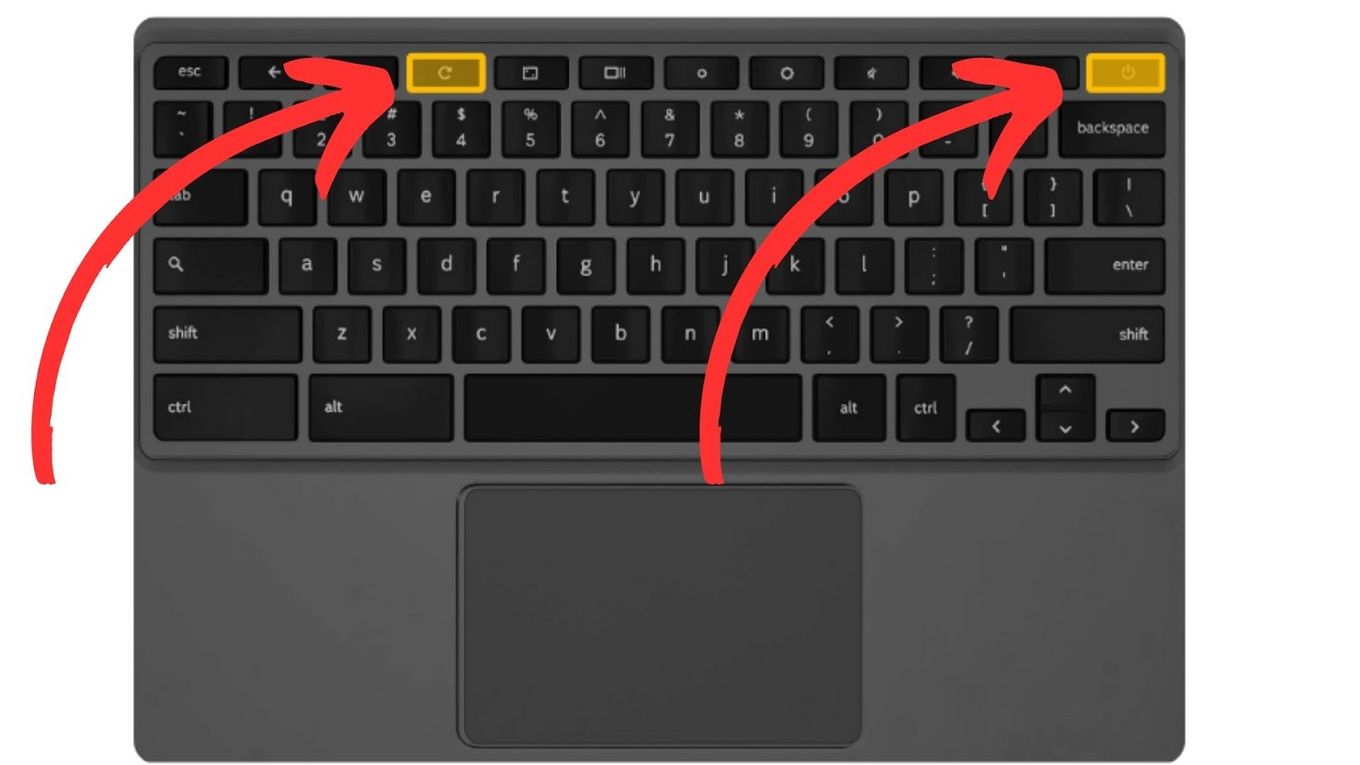
Alternatively, you can also hard reset your Chromebook by clicking a special reset button, removing the power cable, or re-inserting the battery. Afterward, you can follow the steps on the device list.
Solution 3: Reformat Your SD Card
If the two methods do not fix your SD card not reading, you will need to consider reformatting it.
You can use the steps we explained before in this post. Remember to select the adequate file system for your SD Card.
How to Remove SD Card From Chromebook?
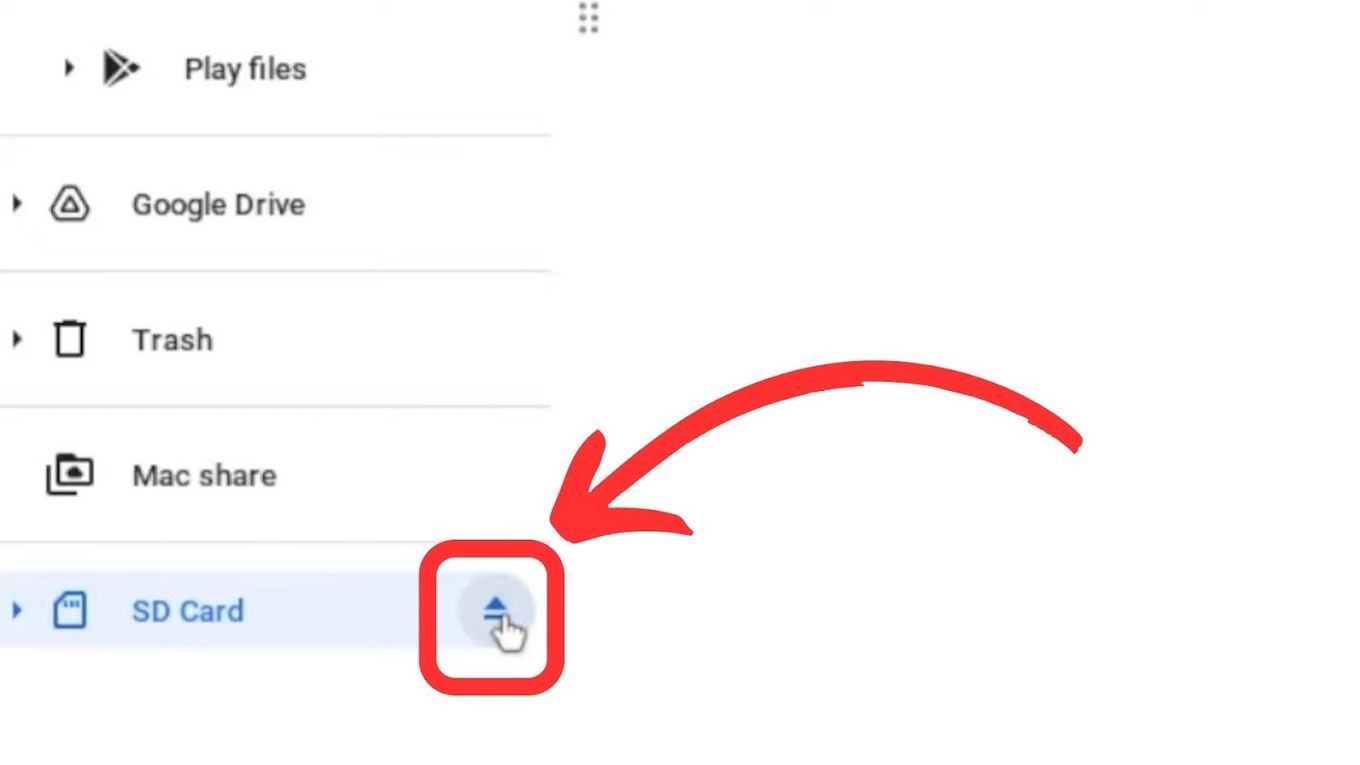
Although you might be tempted to remove your SD card without ejecting it, doing so may have serious consequences. To safely remove your SD, you have to:
- Step 1. Click and open the “Files app”.
- Step 2. Select the SD card on the left panel.
- Step 3. Press the “Eject” Icon.
- Step 4. Remove the SD card.
![What Makes Chromebooks So Bad [And What They're Good For] why-chromebooks-bad](https://alvarotrigo.com/blog/wp-content/uploads/2024/01/why-chromebooks-bad-300x188.jpg)
![14+ Best Animation Software for Chromebooks 2024 [Reviewed] animation software chromebook share](https://alvarotrigo.com/blog/wp-content/uploads/2023/08/animation-software-chromebook-share-300x150.png)
![10 Best DAWs for Chromebook [Reviewed & Ranked] daws chromebook share](https://alvarotrigo.com/blog/wp-content/uploads/2023/08/daws-chromebook-share-300x150.png)
![How to Use a Chromebook as a Monitor [ 5 Easiest Ways ] use chromebook monitor share](https://alvarotrigo.com/blog/wp-content/uploads/2023/08/use-chromebook-monitor-share-300x150.png)
![How to Jailbreak Chromebook [+ Know What to Consider] jailbreak chromebook share](https://alvarotrigo.com/blog/wp-content/uploads/2023/08/jailbreak-chromebook-share-300x150.png)
![Lightroom on Chromebook [ How to Use + Best 3 Alternatives ] lightroom chromebook share](https://alvarotrigo.com/blog/wp-content/uploads/2023/08/lightroom-chromebook-share-300x150.png)