Television advancements have changed how we entertain ourselves, primarily allowing us to enjoy premium features and connect to multiple devices simultaneously through different input ports. As a new Roku TV owner, you might need to know about new smart technology, including inputs.

This article will guide you on how to change the input on Roku TV. We’ll highlight solutions for problems related to Roku input problems and review how you can exploit the potential of your TV features.
It’s best to start by looking at what inputs are available on Roku before learning how to switch inputs on Roku TV.
What Inputs Are Available on Roku TV?
The available inputs on Roku TV series include HDMI ports (one HDMI eARC), composite (A/V), live, USB, and antenna. They also include Ethernet (LAN) setups to assist with the necessary online connection. Older Roku versions primarily have HDMI, antenna, and A/V inputs.
As essential inputs, you get numerous HDMIs, differently located to support external devices like Roku devices, consoles, and computers.
You can use the HDMI eARC port to connect Roku TV to modern audio and video equipment.
How to Change Input on Roku TV
Follow these steps to change the input on Roku TV.
Important. Make sure you have a working Roku remote when switching inputs on a Roku TV.
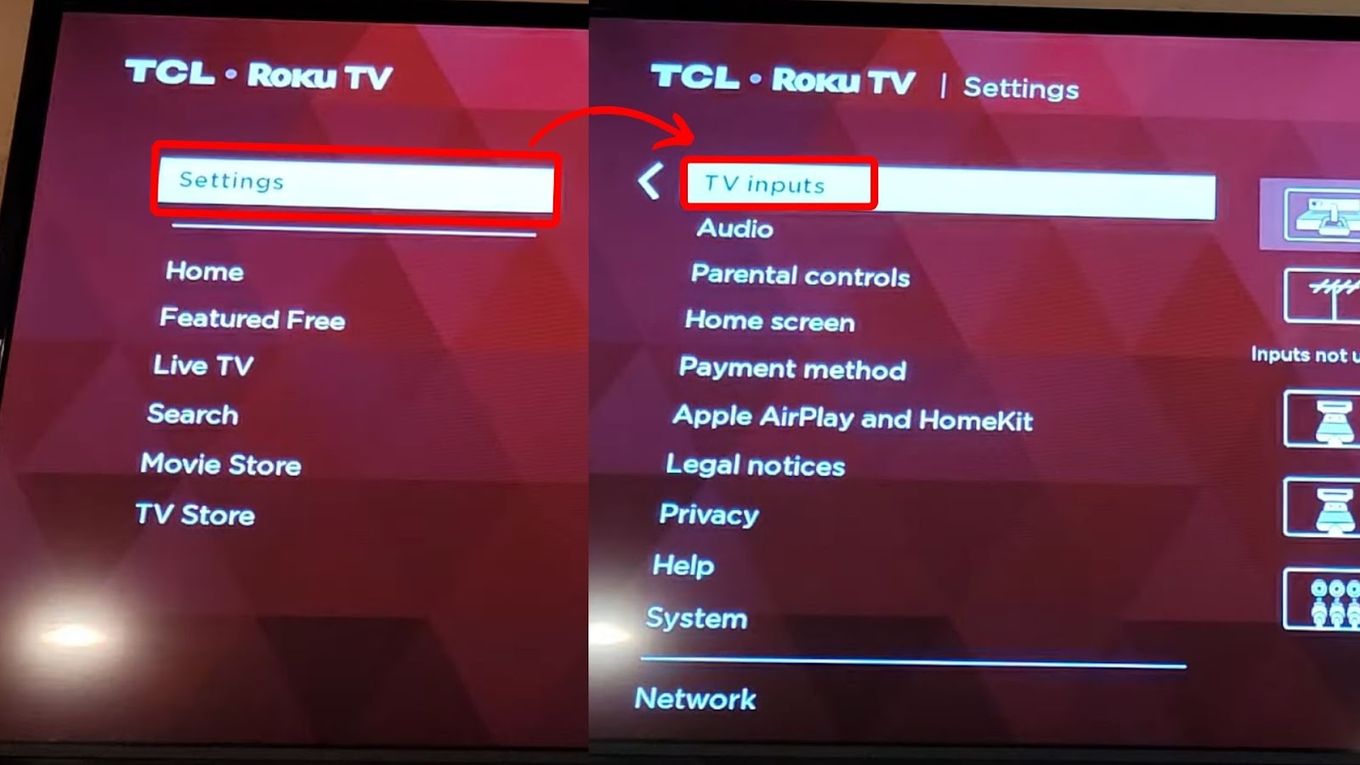
Step 1: Press the “Home” Button & Select “Settings”
Check out how to navigate other Roku settings.
Step 2: Setup the Roku TV Inputs
Roku TV has multiple input options: HDMI 1, HDMI 2, HDMI 3, and eArc/Arc versions.
Follow these steps to find your Roku TV’s TV inputs:
-
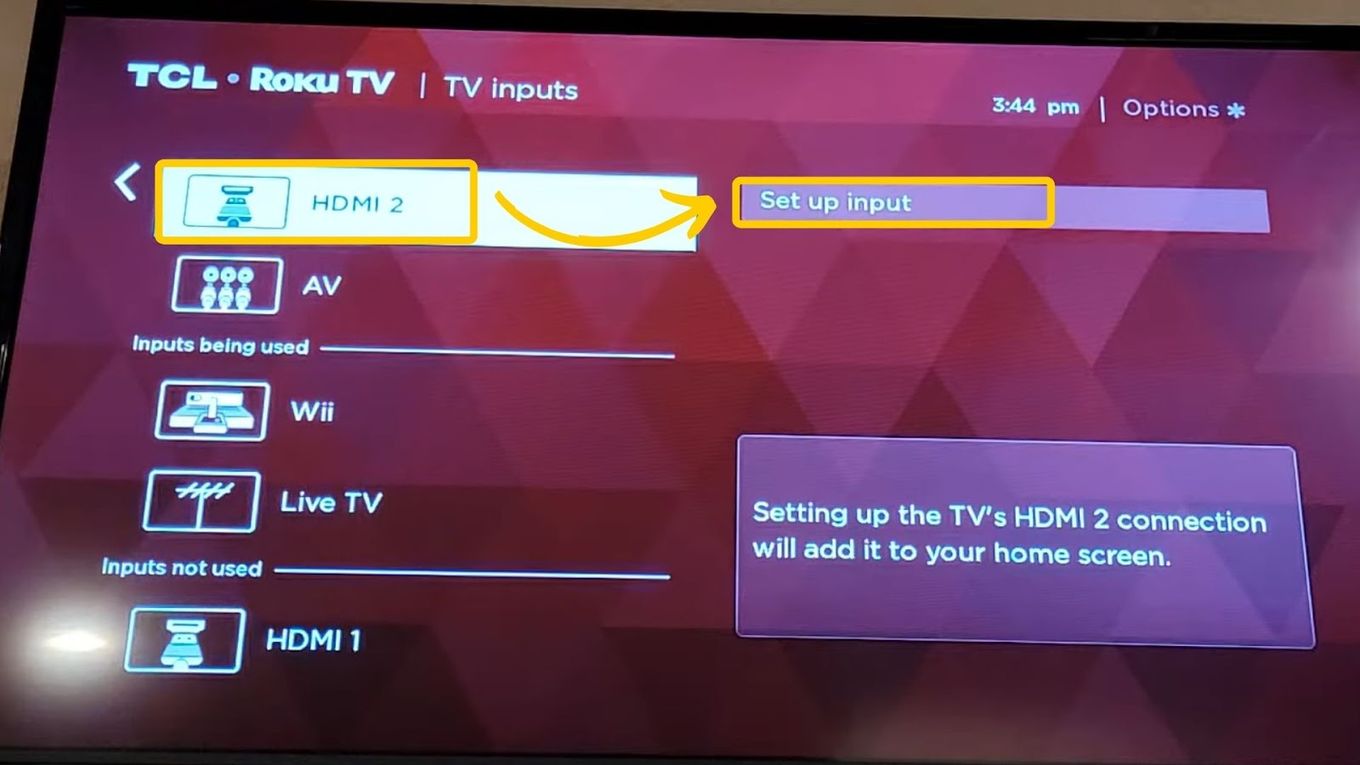
Step 1. Go to “TV Inputs.”

-
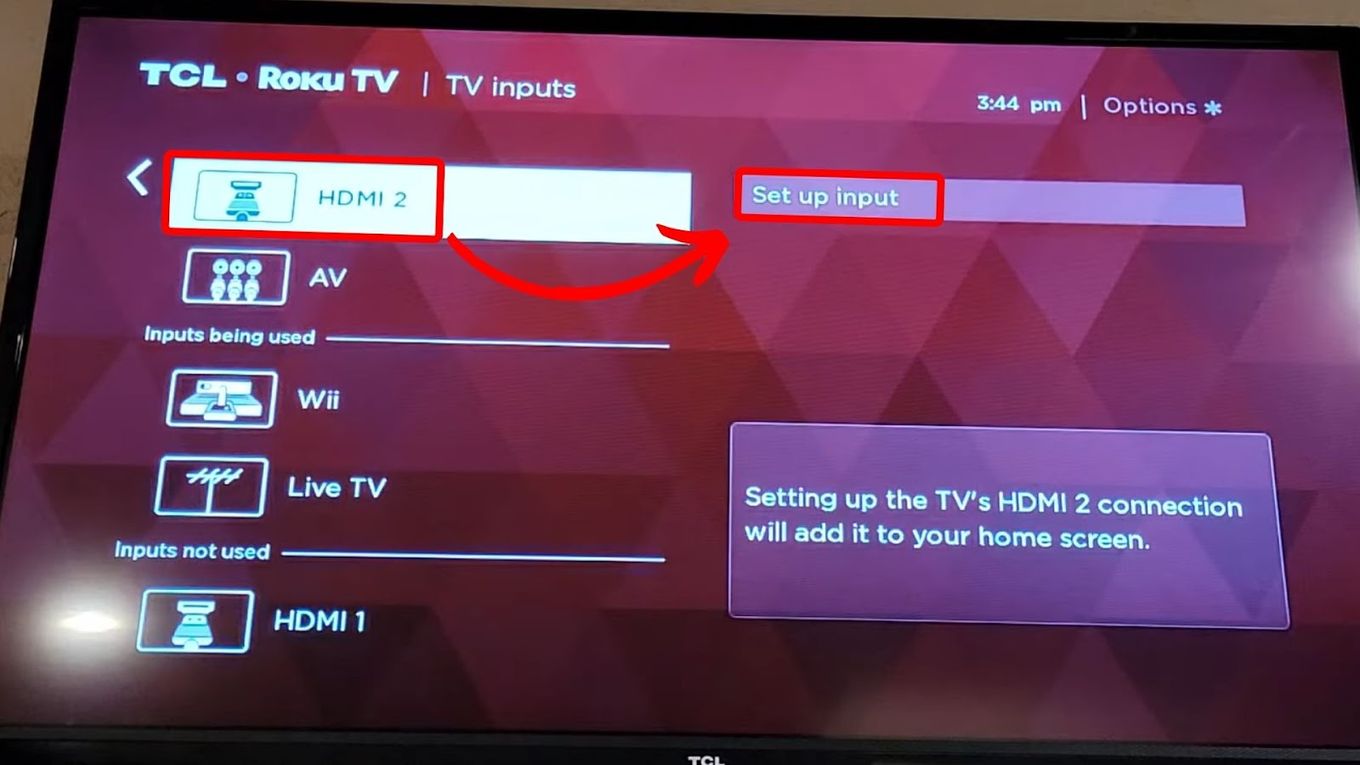
Step 2. Select an input.
-
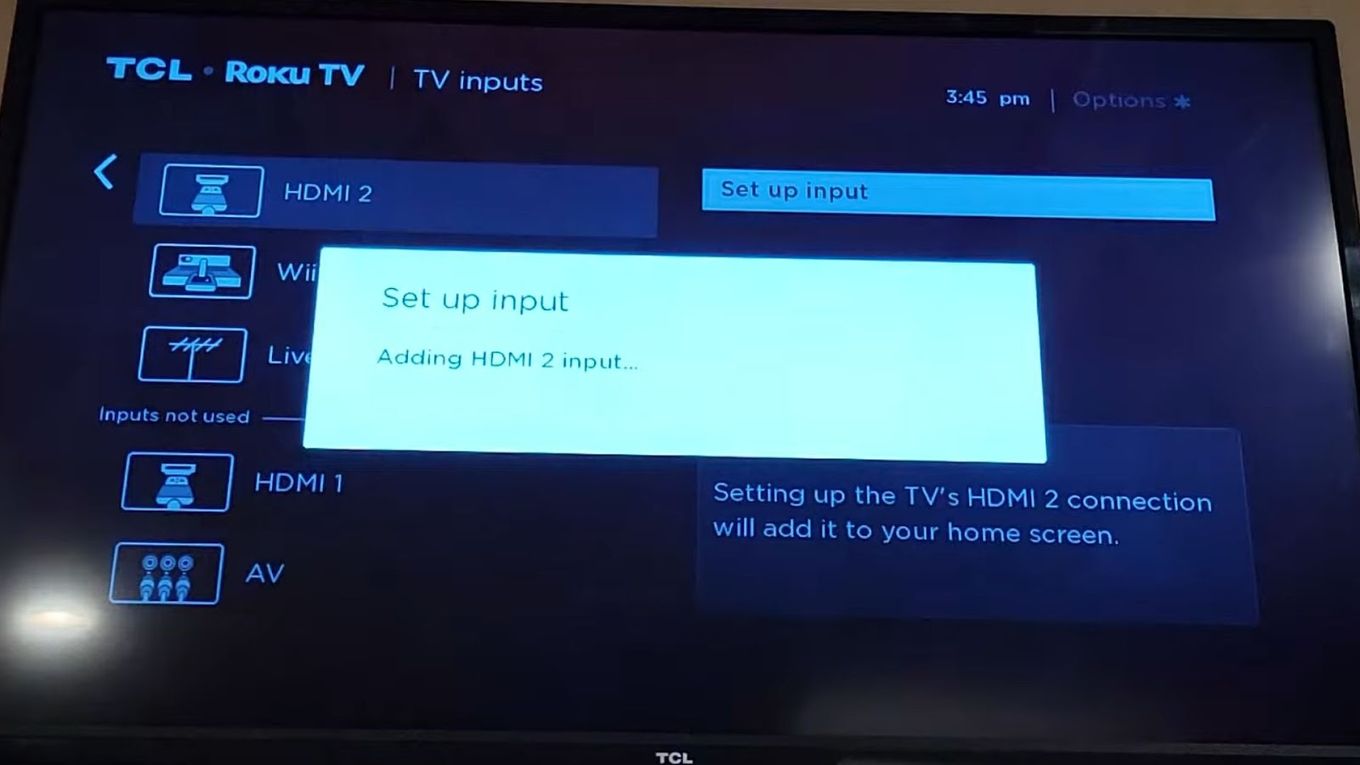
Step 3. Click “Set Up Input.”
Repeat steps 2 and 3 until you have set up all the available inputs on your Roku TV.
-
Step 4. Go back to “Home Screen.”
-
Step 5. Select the input port with a device connected.
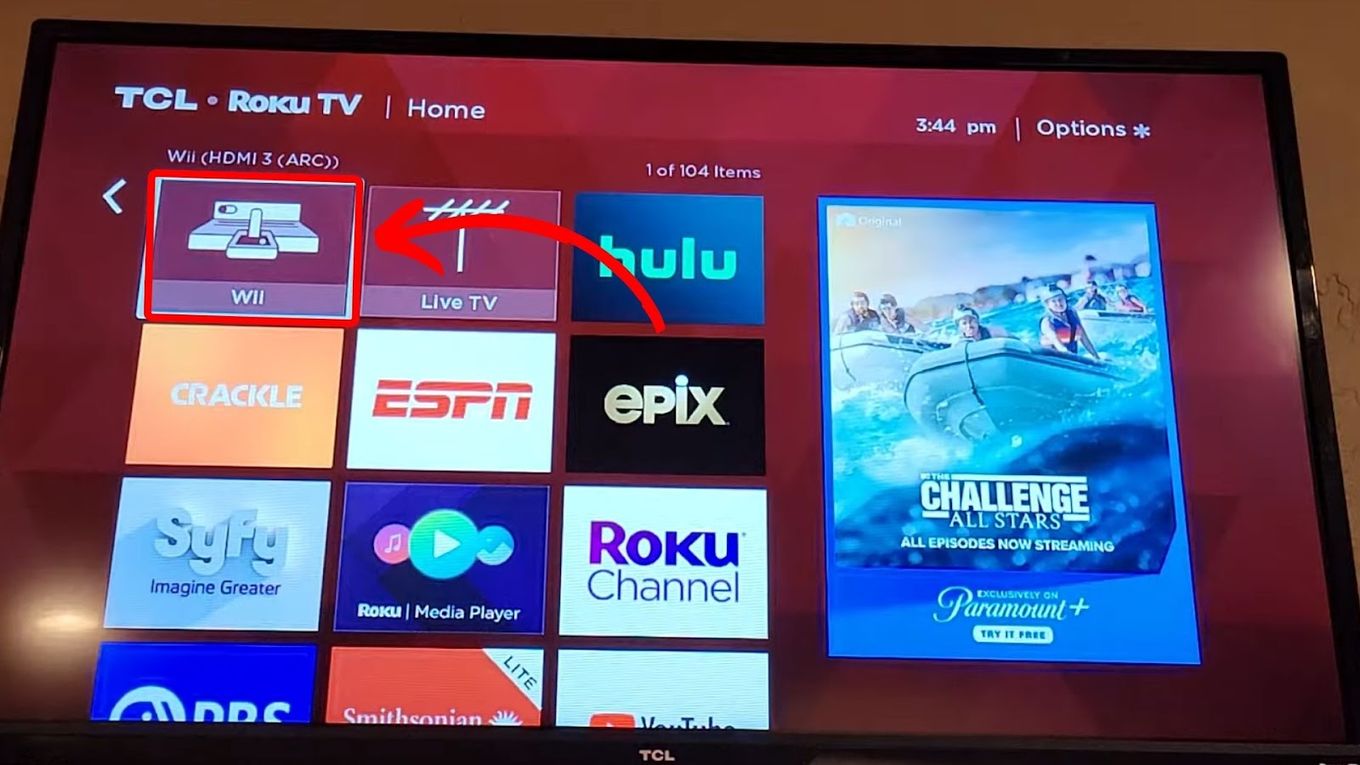
Now that you have set up the inputs of your Roku TV, they will appear on your home screen as tiles. This will allow you to change inputs on your Roku TV.
If you are still confused about how to change the input on Roku TV, you can try to rename and customize them for easier navigation.
Note: If your device is equipped with HDMI-CEC, proceed to the next step to find out how you can change inputs on Roku streaming devices.
Step 3: Setup a Default Input on Roku TV
Considering the array of programs and features, it would be nice if your Roku TV would use a default input every time you turn it on. Fortunately, Roku devices are advanced enough to have this feature.
That said, here are the steps to change your Roku TV input to default:
-
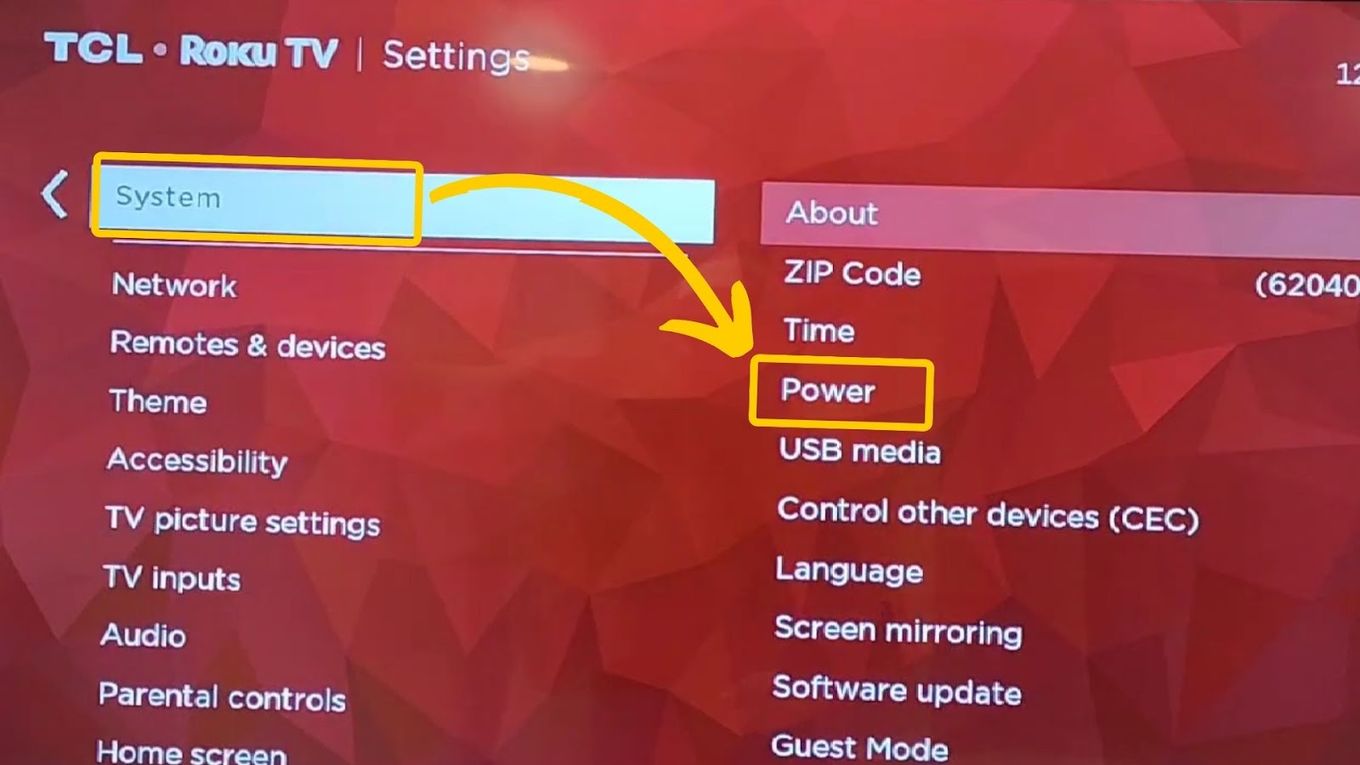
Step 1. Go to the “Settings” menu.
-
Step 2. Scroll and choose “System > Power.”
-
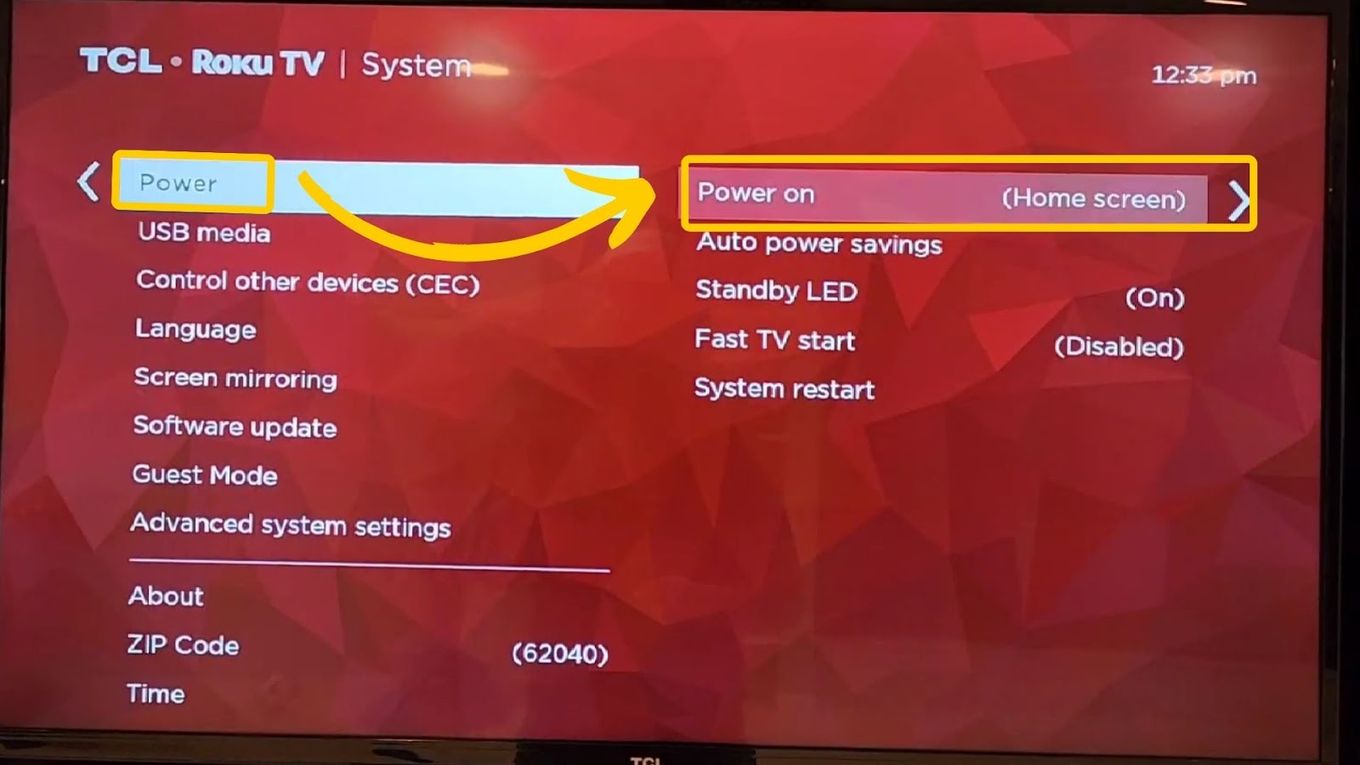
Step 3. Select “Power On” and view the available options.
-
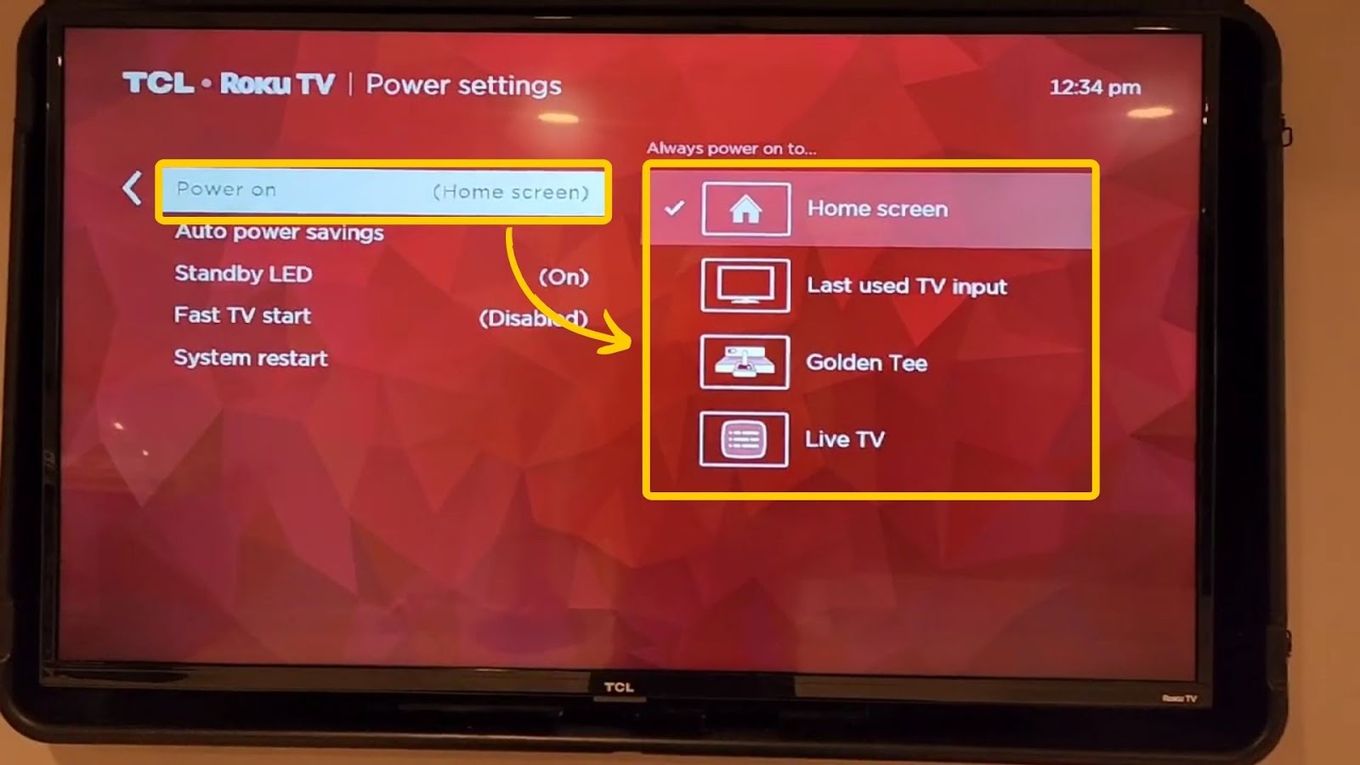
Step 4. Choose your preferred default Roku input.
What Is Roku TV HDMI CEC?
HDMI CEC (Consumer Electronics Control) is technology available on HDMI-enabled devices like Roku TV, allowing the connection of up to 15 inputs. The CEC feature enables the control of multiple inputs under one remote command. It automatically selects the HDMI port with a connected device.
Through the CEC, your Roku TV can support and manage multiple streaming devices, like DVDs and consoles, without needing to switch off your TV.
Any of Roku’s HDMI ports can also help you connect Roku devices to access Roku TV smart features if it’s equipped with HDMI-CEC.
Follow these steps to set up Roku’s HDMI-CEC:
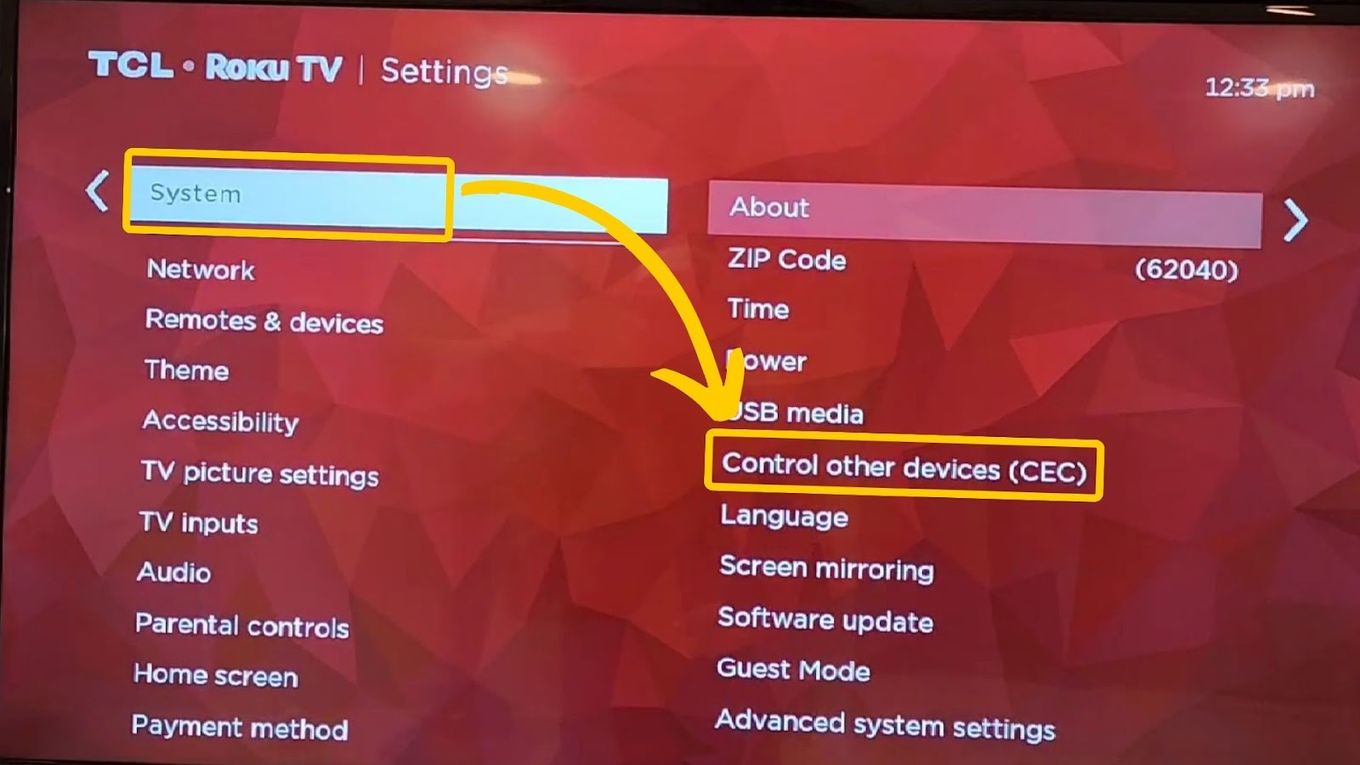
Step 1: Go to “System”
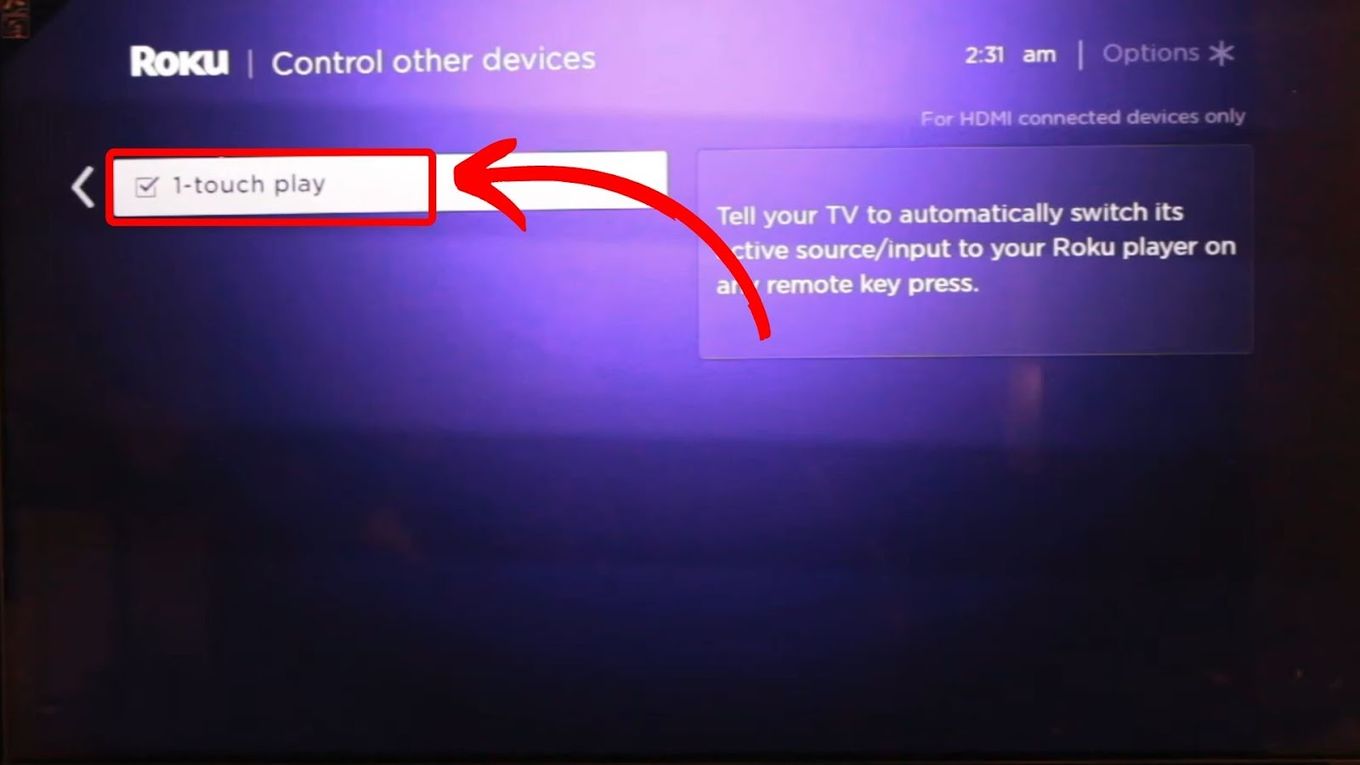
Step 2: Access “Control Other Devices (CEC)” or “HDMI-CEC”
Step 3: Turn on “1-Touch Play”
To switch inputs, you have to turn your Roku TV off. The correct input will be set automatically once you turn the Roku TV back on.
If this is your first time using Roku devices, here is Everything You Need to Know About the Roku Streaming Stick.
How Many HDMI Ports Are on a Roku TV?
There are 4 HDMI ports on Roku TV, with an additional input HDMI eARC for the modern series. The four accommodate basic connections like a Roku player, streaming stick, and devices like consoles. Meanwhile, the HDMI eARC is crucial when using features like 4k video and high-quality sound outputs.
If you are a gamer, the HDMI eArc port is the way to go for the best video resolution. However, whichever HDMI input you choose, each offers the best results with Roku TV.
Important! Remember to enable the HDMI-CEC when connected to the HDMI eARC.
How to Troubleshoot Roku TV HDMI Connections
Issues with the HDMI connection can make changing input on Roku TV a challenge. Fortunately, there are various things you can do if your Roku TV’s HDMI connection is acting up.
Here’s how you can troubleshoot the HDMI issues on a Roku TV:
1. Unplug and Plug-In Your HDMI
First, disconnect the HDMI cable, then plug it back in after some seconds. Also, check for loose connection with its port. Initiate the following tip if you are still getting “No Signal.”
Make sure that you set up the right HDMI link after reconnecting the cable correctly.
2. Restart Your Roku TV
Here are the power-switching choices you can perform:
-
Normal Roku TV Shut Down.
Turn off Roku with the remote power button, then press it again after a minute to turn it back on. -
Soft Reset.
You can unplug Roku’s main power cable before switching it on. Wait 30 seconds before plugging in the cable and starting your Roku TV. -
Perform a Hard Power Reset.
To turn on Roku, access thePowerbutton behind the TV. Press and hold for 30 seconds to allow for the hard reset process. The issue will be fixed, and you can switch inputs on Roku TV.
3. Change the Roku HDMI Input Port
You cannot change Roku input when the device is connected to the wrong port. Here’s how to ensure you select and switch to the right input.
-
Step 1. Switch to another HDMI port.
If the cable is in “HDMI 1,” change it to “HDMI 2.”
-
Step 2. Navigate to “TV Inputs.“
-
Step 3. Set up “HDMI 2.“
Repeat with another port if the above process fails.
4. Replace HDMI Cable
Your HDMI cable can be faulty and unable to technically connect with Roku and external devices. The cable can either be old, corroded, or damaged by water or electric short-circuiting.
Buy a quality HDMI cable to avoid the same “No Signal” problem after a short time of use.
Can You Connect a Roku Device to Any TV?
Yes, Roku devices are compatible with any TV as long as they have an HDMI connection. You just need stable internet connectivity to launch the devices. However, top-tier features like 4k and UHD resolutions are only available to TVs capable of handling such graphics.
Worry less if you own an analog TV, as you can utilize an AV Composite Converter to enjoy the Roku Streaming Stick’s premium resolution features. This converter lets you connect HDMI outputs to TVs with AV composite outputs.
Learn more about Roku Streaming Devices’ Compatibility with other devices.
Changing Roku TV Input Is an Easy Process
Understanding how to switch inputs on Roku TV begins by grasping the basic settings and location of the respective ports. The first thing to remember is which HDMI you connect your device to and set up respectively in your input settings.
To make things easier, rename inputs to help with how to add HDMI on Roku. Additionally, use the HDMI CEC for easier control when connected to multiple devices.


")