The Nintendo Switch is an excellent handheld gaming console and is loved by many around the world. While it is known for its ability to play games, did you know you can use a web browser on your Nintendo Switch and surf the internet?

If you didn’t already know, that is because this feature is currently secret, and you must perform a series of tasks to enable the Nintendo Switch web browser.
In this article, we will uncover how to access the hidden web browser on the Switch. It doesn’t matter whether you have the latest Switch or an older model; this works for all versions.
How to Use The Hidden Web Browser On Your Switch
To access the built-in Nintendo Switch internet browser, you have to change the console’s Domain Name System service (DNS). It’s an unofficial method, but it works, and you don’t need to be an expert to implement it.
Warning: Although no reported malware targets the Switch browser, remember that this is an unofficial way to surf the internet — use it at your own risk, especially when using a modded Switch version.
Here is the workaround to use the hidden browser on Switch:
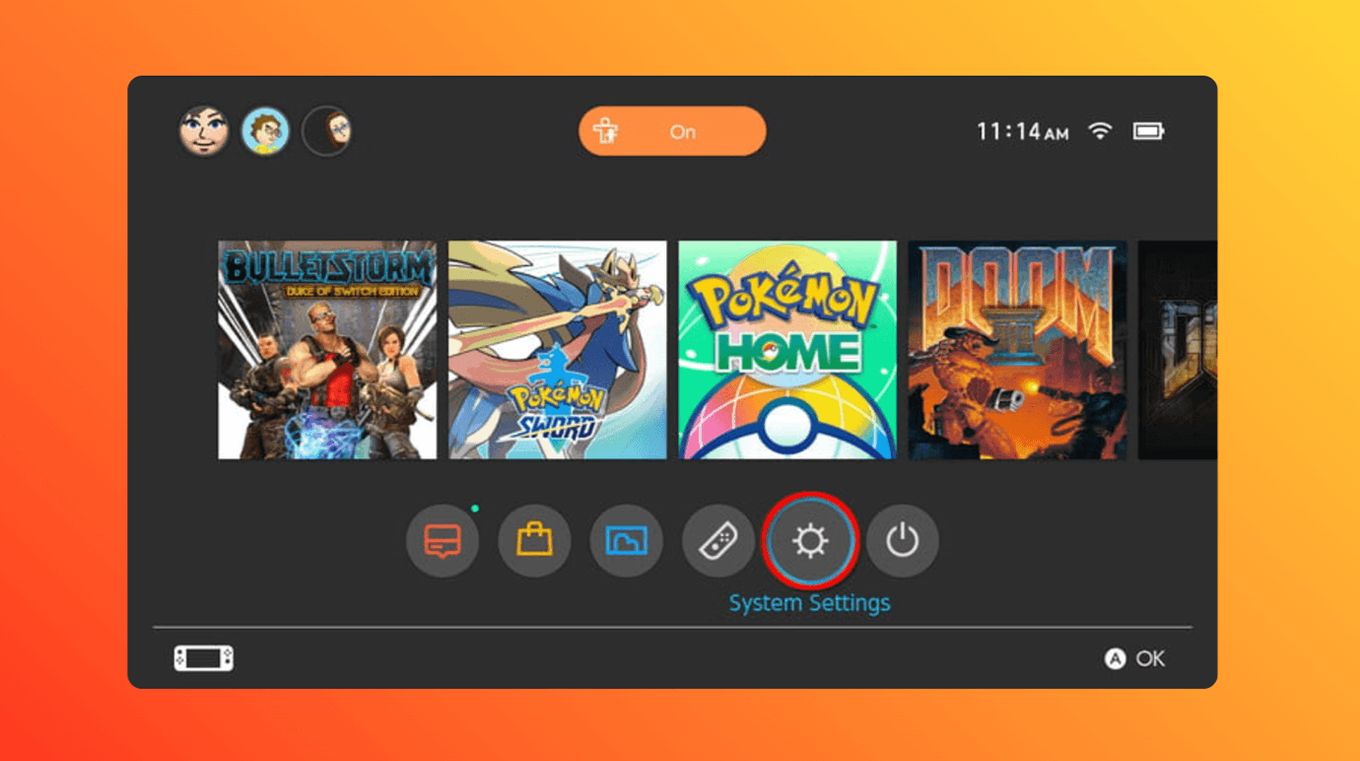
Step 1: Navigate to the System Settings Screen
Tap the “gear” icon, located on your home screen.
Step 2: Access Your Internet Configuration
Click on “Internet > Internet Settings”

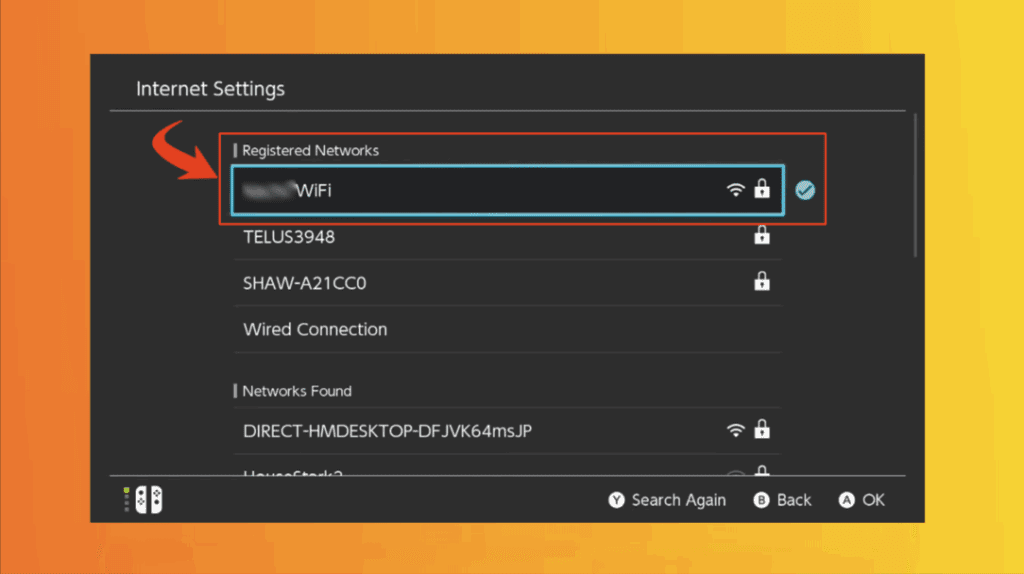
Step 3: Select Your Wi-Fi
You will find it in the “Registered Networks” list.
Step 4: Change Internet Settings
In the next screen, you will find three options. Click on “Change Settings.”

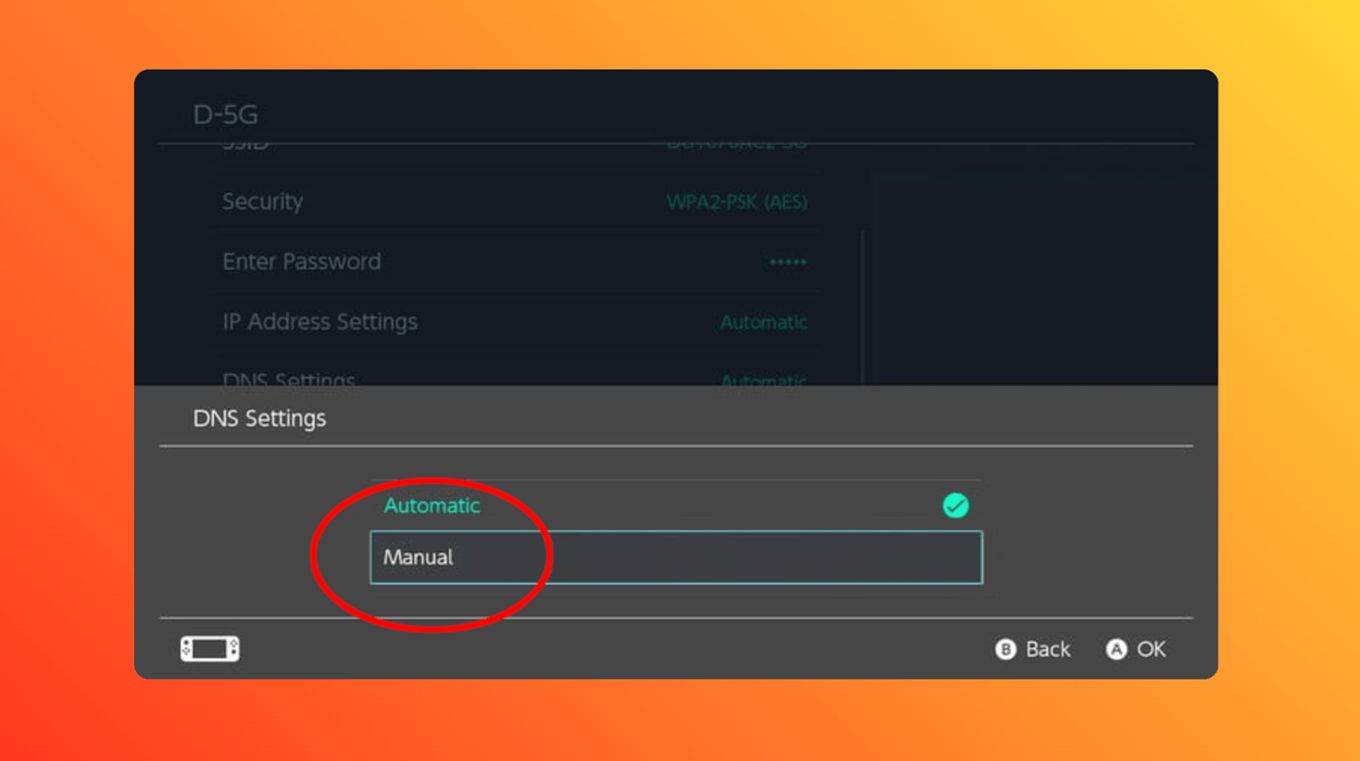
Step 5: Select Manual DNS Settings
Go down and you will find a button labeled “DNS Settings.” From there, click “Manual” – this enables us to change our Wi-Fi’s DNS settings.
Step 6: Change Primary DNS to 045.055.142.122
Look for “Primary DNS” and click on it. Change the IP number and then click “Ok” and “Save” the new configuration.
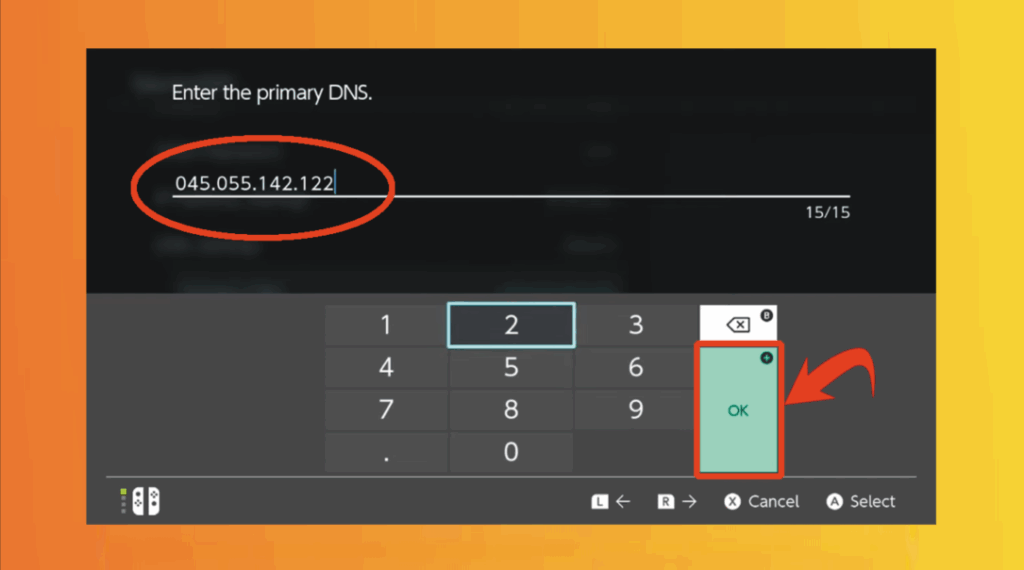
The IP 045.055.142.122 is linked to a service called SwitchBru. It is similar to an application that enables the internet browser on your Nintendo Switch device by redirecting you to the famous search engine.
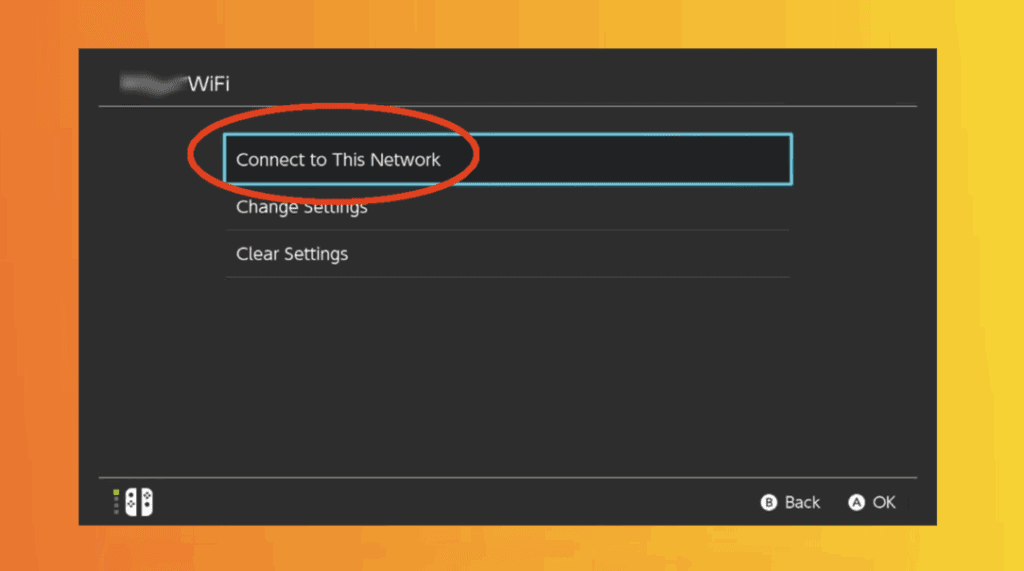
Step 7: Connect to the New Network
After clicking “Save”, select “Connect to this network”
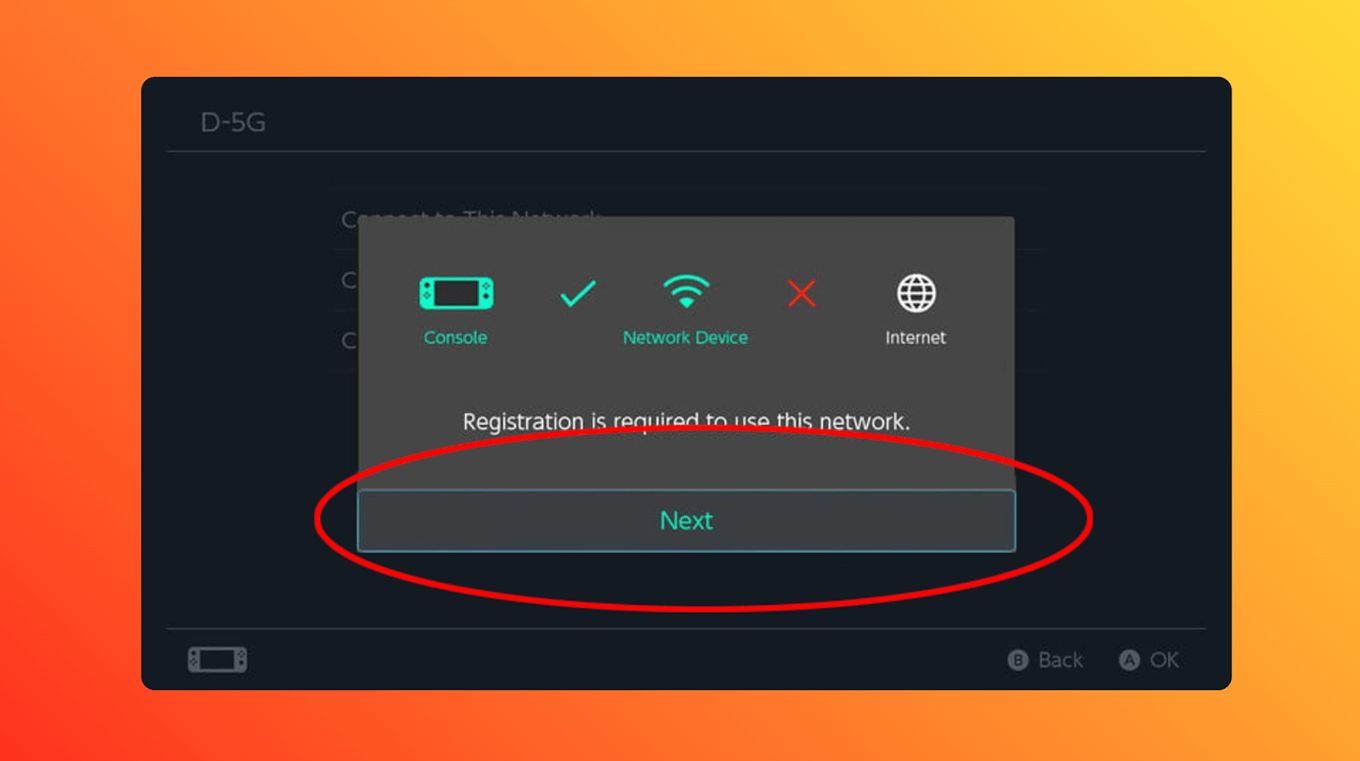
Step 8: Skip Registration
After you attempt to reconnect to your network, you will see the message above. This means everything worked correctly, and you must now hit “Next”.
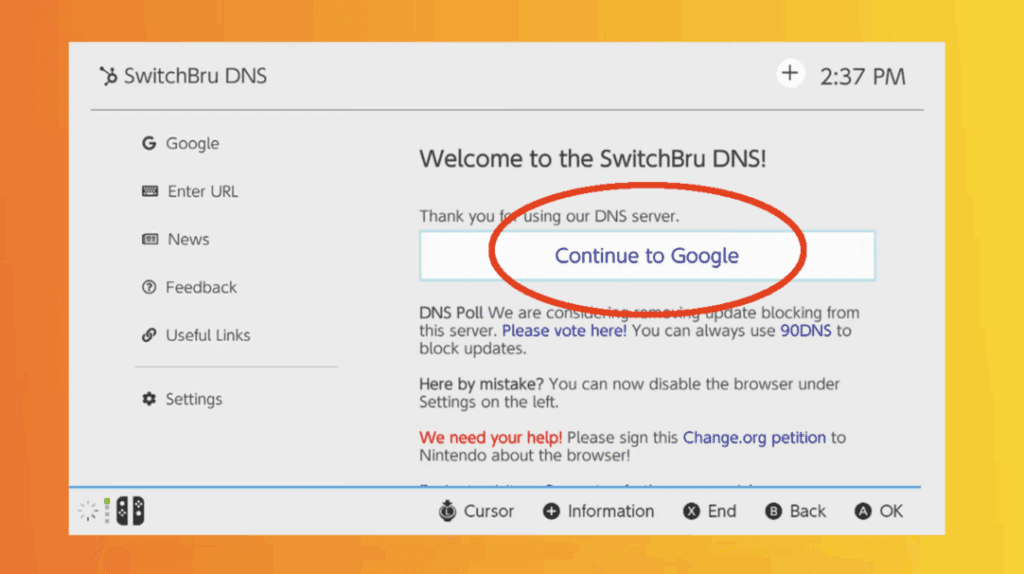
Step 9: Tap “Continue to Google.”
This is the homepage you should see once you have tricked your console to display the SwitchBru DNS page. Just click the main button to launch the browser on your Nintendo Switch.
Is SwitchBru Safe on Nintendo Devices?
Yes, Switchbru is safe to use. It works by redirecting your Nintendo Switch to a custom DNS, allowing access to the hidden web browser. Since it doesn’t involve hacking or jailbreaking, it won’t result in a ban from Nintendo services or any warranty-breaking problem.
However, remember that it is a third-party tool. As always, be cautious when sharing personal information online to prevent your data from being tracked or stolen.
Have a smart TV and Roku? We wrote about the best web browsers to use with Roku, check it out
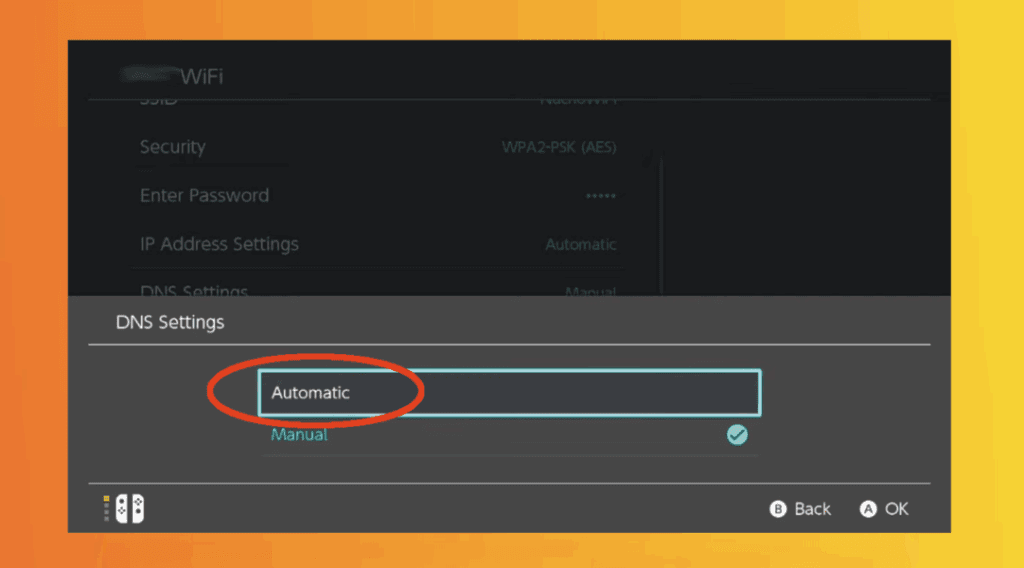
How to Revert to the Default Gaming Settings
Setting your Switch to force it to display SwitchBru’s homepage whenever you connect to the internet prevents you from using your online games. To go back to playing mode on your Switch, select DNS settings and change the setting from ‘manual’ back to ‘automatic’.
The following steps will revert your console to the default setting and have your switch back to normal again:
- Step 1. Go to “Internet > Internet Settings.”
- Step 2. Tap “Change Settings.”
- Step 3. Find and top “DNS Settings.”
- Step 4. Set to “Automatic.”
If the “Automatic” option fails and you get network problems, try out the following secure Google search DNS IP addresses: use 8.8.8.8 for your primary DNS and then use 8.8.4.4 for your secondary DNS, and everything should work as usual. Now everything should be under control again!
Limitations of Nintendo Switch Hidden Browser
The Nintendo Switch’s secret browser has basic browsing capabilities. Still, it can be said to lack support for many modern web technologies, plugins, extensions, Flash, and advanced video streaming, which restricts its functionality compared to standard browsers.
Here are the main limitations of Nintendo’s secret browser:
- No Video Support. Websites like YouTube won’t play videos properly or at all.
- Limited Compatibility. Some modern websites may not load correctly or may display broken layouts.
- No Tabs. You can only view one page at a time with no tabbed browsing or multiple windows.
- No History. The browser doesn’t save any session data, so you can’t view browsing history.
Squeezee Nintendo Switch Online Capabilities
Accessing the hidden web browser on your Nintendo Switch is a helpful trick that doesn’t require any hacking. While it’s not an official feature, using SwitchBru is a safe and straightforward method for most users. And when you’re done, it’s easy to revert your settings and get back to gaming.


")